.png)
Remote development for BC with VS Code
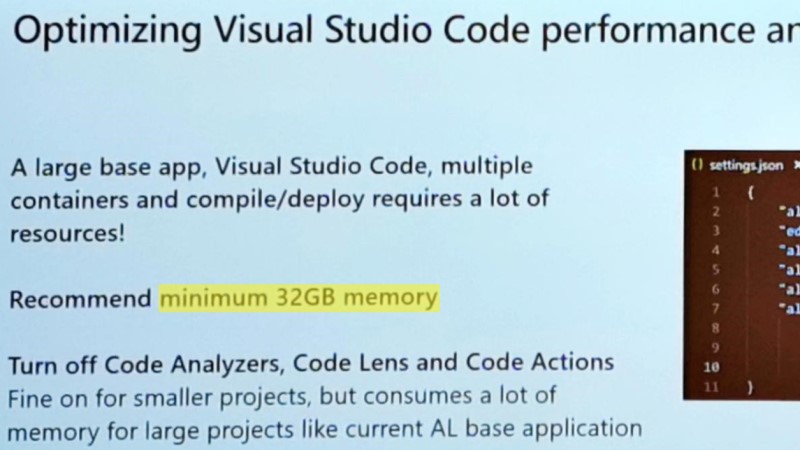
If you have worked with larger AL solutions or been to Directions EMEA 20191 and the session by Peter Borring on the move from C/AL to AL, you know that while the modern dev tools for Microsoft Dynamics 365 Business Central are really a huge step forward, they are currently a bit resource intensive on larger projects.
While that by no means is a showstoper, it in my opinion is one more reason to consider central development environments like on Azure VMs where you can provide a lot of resources on demand. Say you want a machine with 8 cores and 56 GB of RAM, that basically is just a snap of your finger on Azure. But it also has it’s issues. As shown in the very same Directions session and clear to anyone who has even remotely followed the progress of BC development in the last couple of months, navcontainerhelper is an indispensable tool, gaining even more traction with the C/AL to AL conversion and a lot of very helpful cmdlets in that area. But it kind of expects to run directly on the Docker host. That is possible e.g. through WinRM, but then you will need to have your code also on the Docker host and if that is the case, your VS Code will also need to run on the Docker host. Again, you can solve this e.g. through RDP, but that also isn’t an ideal solution2. Fortunately Microsoft has introduced the VS Code Remote Development Extension Pack, which allows you to have a local VS Code interact very seamlessly with a remote VM3.
The TL;DR
Here is what you need to do at the moment (Oct 19, 2019), to set this up, although it should become a lot easier and more readily accessible in the future:
- Download and install the Insiders version of Visual Studio Code, the Remote Development Extension Pack and the Remote - SSH (Nightly) extension
- Create a VM using aka.ms/getbc, install and start the “OpenSSH Server” service and allow access to it on the Azure firewall
- Configure public key based authentication on the VM and connect to the VM through VS Code
- Configure the VS Code AL extension to run remotely
- Start and use your containers from the VS Code terminal (which now actually has a session on the VM) with navcontainerhelper, but make sure to map the needed ports to host ports and bring those to your client using the Remote Development extension.
- Work as usual with AL
Currently there is one major issue: As the AL extension is running remotely, it tries to open the browser remotely as well when it starts a debugging session - or at least I think that happens as the AL extension just fails to do anything at that point. Because of that, you can’t debug as expected, which of course is quite a problem. The workaround is to publish without debugging and just manually open your browser window, but that of course is a very poor workaround as you can’t get a real debugging session. I have opened an issue with the AL development team and hope to get some feedback there. If you share the opinion that this would be very useful to have, add your comment or like there as well.
Depending on your point of view and experience, this might seem easy or difficult, but in the end you get a seamless dev workflow with a local VS Code and remote containers. Assuming you have a container running on your VM, this is what creating a new AL extension project and working with it would look like:

There are people who claim Azure is expensive, so let’s break this part down as well: Consider a developer who on average works 6 hours a day on tasks where she needs that 8 Core / 56G RAM machine. She does this every work day of a month, which means she needs 22 * 6 = 132 hours of that machine. It takes a bit to start and stop, so let’s calculate with 140 hours. She also need some storage and to be on the safe side, we add a 512GB SSD. The total cost for a month would be 126,87€ if you run that machine in the West Europe Azure region! If you can settle for 4 cores, 28GB RAM an 256GB SSD, the same amount of usage would cost you 64,22€.
To me, that is an amount of money well spent if it allows her to work quicker, more efficiently and reduce waiting times. If this setup only safes here 15 minutes a day, that is 7 hours a month, so you basically get one more working day a month. And if she has a VS Enterprise subscription, even that bigger VM would neatly fit into her free Azure budget. As always, your mileage may vary, but this seems like a pretty good deal to me.
The details
Now, if you want to try this yourself, the list above might be a bit abstract. Here are the detailed steps:
- Download and install Visual Studio Code - Insiders as only the Insiders version currently supports what we plan to do.
- Add the Remote Development Extension Pack to your VS Code - Insiders, then uninstall the “Remote - SSH” extension and install the “Remote - SSH (Nightly)” extension. Again, this is because only the nightly version supports what we plan to do.
- Create a VM using aka.ms/getbc. In case you are wondering: No need for Traefik in this scenario, as we will use the Remote Extension to tunnel the necessary ports through SSH to your local machine.
- Connect to your VM with RDP, open the start menu and search for “add optional features”. After opening that, you should see that the “OpenSSH Client” is already installed, but you need to add the “OpenSSH Server”, because the Remote Development extension connects through SSH. After installing, you need to update a couple of settings, so don’t start the service yet but do the following:
- Open c:\ProgramData\ssh\sshd_config
- Find the line
#PubkeyAuthentication yesand remove the leading#. With that we activate public key authentication for SSH, which is the only supported authentication option for the Remote Development extension. - Find the following lines and also remove the leading
#in both. I don’t like the idea of a centralized auth file and I couldn’t get it to work… With that in place, SSH looks for the authenticated keys in the home folder of your users. - If you don’t have your personal SSH key pair yet, follow the steps outlined here to create one on your laptop / local machine.
- Create a folder .ssh in the home folder of your user in the Azure VM (use
mkdir .sshin the cmd as the Windows Explorer doesn’t allow you to create a folder of that name). - Create a file called authorized_keys and add the content of your public key file (likely stored in your local .ssh folder with the name id_rsa.pub).
- Start the OpenSSH service on your VM. While you have that open, you might want to set it to automatic start.
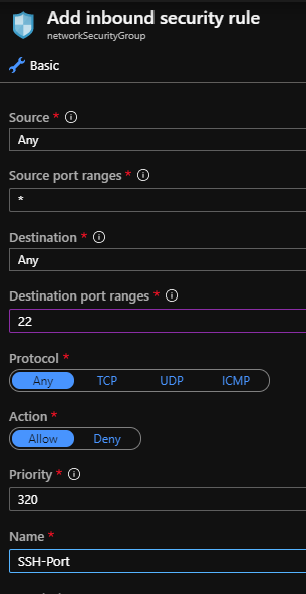
- Open port 22 in the Azure firewall for your VM by going to the Azure portal, selecting the VM, going to networking and then adding an inbound rule wit the following settings:
- To test the connection, open a cmd on your local machine and enter something like
ssh -l <user-on-vm> <public-name-of-vm>. So if your user is calledvmadminand your machine is reachable atremotedev-cc.westeurope.cloudapp.azure.com, that would bessh -l vmadmin remotedev-cc.westeurope.cloudapp.azure.comThis should connect without asking for a password as it now uses your SSH key pair to authenticate you. With that, we have the base configuration of our VM in place and we can configure VS Code.
- Back on your local machine, open the VS Code settings (Ctrl+,) and go to the JSON settings file by clicking on the icon on the top right as we are about to add a preview setting, which is not available in the GUI. When the file has opened, add the following line:
"remote.SSH.remoteIsWindows": true,This lets the Remote - SSH extension know that the host we are connecting to is a Windows host and is the reason why we needed to install the Nightly extension as that setting is only available there. Be aware that you need to change this back to false or remove it, if you want to connect to a Linux host.
- Open the Remote Explorer (Ctrl+Shift+P and type “view rem exp” if you can’t find it). Expand “SSH targets”, select the + icon to add a new target and enter the same command you used above to validate the connection, e.g.
ssh -l vmadmin remotedev-cc.westeurope.cloudapp.azure.com. - The VM should appear in the SSH targets list. Right-click on it and select “Connect to Host in Current Window”. For whatever reason the first connect to a VM usually fails for me, but the second one works. With that we have VS Code connected to the VM, indicated by the info element in the bottom left of your VS code window:

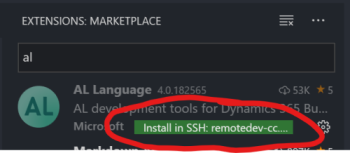
That means that we now have a locally running VS Code, but the files we see or the terminal we open, are actually on the VM. You can verify this by trying to open a file, which will give you a file picker on the VM or by opening a terminal, where you also will find files on the VM. - In order to work with AL, we now need to tell the AL extension that we want it to run on the VM as well. In order to do that, go to the extension list and find your AL extension. It should show an action that allows you to install it on the VM. Click on that and reload the window when it has finished.
The same is true for all other extensions like for Docker that you might want to use on the VM. Now that we have AL in place, hit Ctrl+Shift+P and call “AL: Go!” to set up your project. Select the “own server” config but hit escape afterwards as we need to set up our container before that can work. - The last step now is to create a container with the necessary config, so that we can use it. As mentioned above, we will use port mapping for the networking aspects. The reason for that is that the Remote Extension allows us to tunnel ports on the host to ports on our local machine, allowing us to enter URLs with local ports and thereby connect to ports on the VM without any firewall setup. Pretty cool…
- Start a terminal. This will default to cmd, so just enter
powershellto get a PowerShell session and thenimport navcontainerhelperto - surprise - import navcontainerhelper. - Set up the port mapping config in a variable
$additionalParameters = @("--publish 8180:80", "--publish 7146-7149:7046-7049")With that we map port 80 of the container where the WebClient is reachable to port 8180 and the BC ports to the same number, just incremented by 100. By that I want to show you that you don’t have to use the same ports as that would conflict as soon as you start your second container but instead you can use arbitrary mapping ports.
- Create a new BC container. You can use whatever you usually do to create a new container, just remember to add the additional parameters for the ports
New-BCContainer -accept_eula -containerName test ` -auth NavUserPassword ` -imageName mcr.microsoft.com/businesscentral/onprem:ltsc2019 ` -additionalParameters $additionalParameters ` -Credential (New-Object System.Management.Automation.PSCredential ` -ArgumentList ('admin', ` (ConvertTo-SecureString 'My5uperSecretPwd!' -AsPlainText -Force))) - Go to the Remote Explorer again, but now open the “Forwarded Ports” section. Hit the + icon and enter 8180, leave the second entry empty. With that we have tunneled the local port 8180 to the VM port 8180, which in turn is mapped to port 80 in the container and therefore gives us access to the WebClient. Do the same for port 7149 (the development service port).
- Now we need to tell the AL extension where our BC server is: open your launch.json file, add
"port": 7149,and replace the server instance name with"BC". In the end it should look similar to this if you are using the default AL base template:{ "version": "0.2.0", "configurations": [ { "type": "al", "request": "launch", "name": "Your own server", "server": "http://localhost", "port": 7149, "serverInstance": "BC", "authentication": "UserPassword", "startupObjectId": 22, "startupObjectType": "Page", "breakOnError": true, "launchBrowser": true, "enableLongRunningSqlStatements": true, "enableSqlInformationDebugger": true } ] }Note that we are using
localhostas server because both the AL extension and the container are running on the VM and we have mapped the ports. As an alternative we could have used the-updateHostsswitch and the name of the container as server URL, but then we wouldn’t have the option to directly connect from our client. - Hit Ctrl+F5 to publish without debugging. This should download the symbols, compile your extension and publish it to the container with the exact same workflow as if you were running the container on your machine. The only differenc is as mentioned above that we can’t hit F5 or in general debug, as this would try to open the browser remotely, which of course doesn’t work.
- Now all that is left to do is to verify the deploment: We have tunneled the local port 8180 to 8180 on the VM, so go to http://localhost:8180/BC and you should see the login window. Log in and go to the customer list where our sample extension should show a message!
- Start a terminal. This will default to cmd, so just enter
To interact with your containers, just install the Docker extension on the remote machine as mentioned above. Then go to the Docker view, right-click on your container and select “Attach Shell” to get a shell into that container.
I personally really like that kind of setup as it allows a standard, centralized setup of development machines with the benefit of a local VS Code installation. In my mind, it brings together the best of both worlds. The setup needs to come along a bit, but I am very sure the team working on the Remote Development extension pack will advance that a lot when Windows support comes out of the current alpha / nightly state. And the AL team would need to support opening the browser locally, which I hope they do. The aspnet core extension e.g. can do the port mapping automatically, so that might be an option in the future as well. If you try this, please let me know if it works for you or where you run into issues.
Footnotes
-
By the way, again a very nice conference ↩
-
Maybe it’s just me, but developing through RDP is not 100% as productive as having your dev tools locally. Just a slight lag will annoy me and feel weird. ↩
-
It also supports WSL (the Windows Subsystem for Linux - not directly helpful for BC) and containers, but unfortunately only Linux containers at the moment, although that might change in the future. ↩
Webmentions:
-
The #msdyn365bc AL extension can be a bit resource hungry, but fortunately code has a new trick: remote development. Here is how to use it with BC #Docker containers: tobiasfenster.io/remote-develop… #cosmoconsult
-
Another awesome step will be #vscodeonline as announced here: devblogs.microsoft.com/visualstudio/i…
-
-
-
-
 NavDrive
 DanFlr
 David Feldhoff
 Tobias Fenster


")
")


