.png)
.NET in WebAssembly with Fermyon Spin or how to duplicate your Planner plans with adjustments
I want to preface this blog post with the note that I typically know a lot more about a topic when I write about it than this time. But I only very recently got into WebAssembly and basically started with Fermyon Spin for this blog post. So if anything is wrong or could be done in a better way, I very much appreciate any feedback.
If you watch the general software development space, WebAssembly or Wasm will probably have appeared on your radar in the last couple of weeks and months. I don’t want to give you an introduction into the topic in general, as there are a lot of good ones out there already, but the very short version is that Wasm modules are an even lighter way to package your applications than containers1. As I don’t like to do things just as a “Hello World”, but try to apply it to real problems I have, I decided to update my little Ex- and Import tool for Planner. The old version allowed you to do a couple of things, including duplicating plans, but without adjustments. Now I wanted to be able to adjust start and due times and also assignments during duplication, see more of the use case below. Originally, I wanted to go with the Experimental WASI SDK for .NET Core, but for reasons explained below, I needed to use something else and ended up with Fermyon Spin (shoutout to Thorsten Hans for his presentation at the Azure Developer Community Day where I got my first real look at it).
The TL;DR
What I built so far in the new version of the tool is the ability to get groups and plans and duplicate plans, but this time with the ability to adjust dates and assignments. If you want to give it a spin (fantastic joke, I know), here is the easiest way:
- Create a Github Codespace based on my repo. You can also run it locally as devcontainer. This gives you an environment with .NET, Fermyon Spin and a couple of things around it to make life a bit easier.
- Wait until the
postCreateCommandhas finished (you can view the overall progress in the terminal in VS Code or run the “Codespaces: View creation log” command for the details). This will take a while as it installs all the dependencies. - Run the
runtask to start spin pointing at my tool and follow the log output. - As we need a valid token for authorization, we first need to grab one, e.g. by going to the Azure Cloud Shell, making sure “Bash” is selected in the top left and not “PowerShell” and running the following code snippet (the short version of what you can find in the official docs):
1
curl http://localhost:50342/oauth2/token --data "resource=https://graph.microsoft.com/" -H Metadata:true -s | python -c 'import sys, json; print (json.load(sys.stdin)["access_token"])'
- Open the file called
sample.httpin the root of the repo, copy the token that you get from that command and put it into the file replacing<your-token>in the following snippet
1
2
3
4
@token = <your-token>

GET http://127.0.0.1:3000/groups
Authorization: Bearer {{token}}
- Thanks to the amazing REST Client extension in VS Code, you can now hit the “Send Request” action that should appear above the
GET ...line to send a request to my tool and if you have any O365 groups, those should be returned.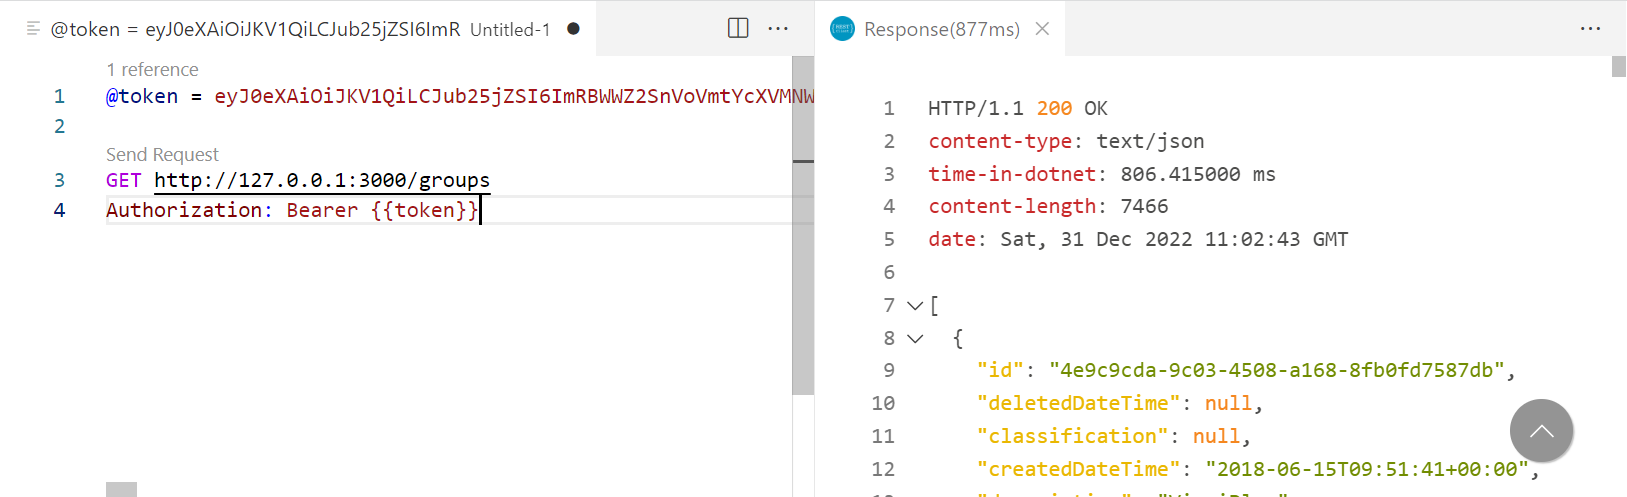
If you want to understand more about how this works, what I learned on the way and what else you can do with my little tool, check the details!
The details: Other things to do with the tool
The calls explained in this section are all also in sample.http in the repo, so you can just go step by step on your own following the blog post, or you can use the file.
As you have seen above, we can query for O365 groups, but because those might be a lot, you can also pass in a search string like this
1
GET http://127.0.0.1:3000/groups?groupSearch=abc123
This will give you all groups that start with abc123. But as the tool is not about groups, but about plans, we can also query for plans. To get the plan, we however need the ID of the group containing the plan, so we needed to look at the groups first. Assuming that you have the right search string in place, you can do the following, where you use the result of the first query as a variable in the second query. You first need to run the first request to populate the variable, and then you can run the second request to get all plans in that group.
1
2
3
4
5
6
7
8
9
###
# @name getgroups
GET http://127.0.0.1:3000/groups?groupSearch=abc123
Authorization: Bearer {{token}}

###
# @name getplans
GET http://127.0.0.1:3000/plans?groupId={{getgroups.response.body.$[0].id}}
Authorization: Bearer {{token}}
The second call will give you a result with the minimum metadata of the plan like the title, the owner and by who and when it was created. But we can also use the tool to get the buckets, tasks, assignments, checklists etc. For that, we need the ID of the plan, and you can either copy it from the output or you can reference it in the same way as before. Assuming that you want the details of the first plan (hence [0]), this is what your call would look like:
1
2
3
4
###
# @name getplandetails
GET http://127.0.0.1:3000/planDetails?groupId={{getgroups.response.body.$[0].id}}&planId={{getplans.response.body.$[0].id}}
Authorization: Bearer {{token}}
Those are the basic features for reading information. The next part shows you how you use the tool to duplicate plans.
The details: Duplicating plans, optionally with adjustments
For this part, I want to explain my use case because it might give you ideas for what you can do as well: We use Planner to organize the onboarding of new employees. We have a moderately complex template plan with notes, checklists and assignments. When a new employee joins2, so far we have duplicated that plan. But then, we have to manually go in and a) adjust the dates and b) sometimes adjust assignments. To avoid that, I extended the tool so that you can do the following two things:
- Change assignments: You can put in users (unfortunately technical user IDs, I’ll have to handle that better in the future, either in the frontend or via a better reference) that should be replaced, so that if e.g. in the source plan a task is assigned to you, it will be assigned to the specified user in the duplicate.
- Adjust dates: My idea is to set up the source plan in a way that the start and due dates make sense, e.g. if a new employee starts on Jan 1st 2023. Then I would tell the tool that the
originalReferenceDateis Jan 1st 2023. If a new colleague was to join on e.g. Apr 1st 2023, I would put that atadjustedReferenceDate. The tool calculates the time difference and adds that to the start and due dates. So e.g. if I put a due date in a task in my example to Dec 4th 2022 to make it due 4 weeks before the colleague starts (theoriginalReferenceDate), in the duplicate this would become Mar 4th 2023 as that would be 4 weeks before the new date (theadjustedReferenceDate). We also have some tasks that can happen immediately and for that, I have added a special date calledreplacedWithTodayDate. If a start or due date is set to that specific date, it will be replaced with today’s date.
There could be certainly more sophisticated ways to do this, but it should be enough for my needs, and I like how I can look at the original / template plan and immediately see in the calendar view how it maps out and if it works for our process.
OK, this was the theory behind it, here is how you use it: You make a call to the duplicatePlans route with the source and target plan and group ids and as a body, you optionally add the adjustments that you want to make. A series of calls to get everything in place and then run the duplication could look like this where we first collect the source ids, then the target ids and with the fifth call, make the duplication with adjustments. If you don’t want the adjustments, you can just leave that empty. You can find this also in the duplicate.http file in the repo
1
2
3
4
5
6
7
8
9
10
11
12
13
14
15
16
17
18
19
20
21
22
23
24
25
26
27
28
29
30
31
32
33
34
35
36
37
38
39
40
41
42
43
44
45
46
47
###
# Get source group with search string, replace the groupSearch with whatever works for you
# @name getsourcegroup
GET http://127.0.0.1:3000/groups?groupSearch=abc123
Authorization: Bearer {{token}}

###
# Get plans in source group
# @name getsourceplans
GET http://127.0.0.1:3000/plans?groupId={{getsourcegroup.response.body.$[0].id}}
Authorization: Bearer {{token}}

###
# Get target group with search string, replace the groupSearch with whatever works for you
# @name gettargetgroup
GET http://127.0.0.1:3000/groups?groupSearch=def456
Authorization: Bearer {{token}}

###
# Get plans in target group
# @name gettargetplans
GET http://127.0.0.1:3000/plans?groupId={{gettargetgroup.response.body.$[0].id}}
Authorization: Bearer {{token}}

###
# Duplicate plan with adjustments
POST http://127.0.0.1:3000/duplicatePlan?sourceGroupId={{getsourcegroup.response.body.$[0].id}}&sourcePlanId={{getsourceplans.response.body.$[0].id}}&targetGroupId={{gettargetgroup.response.body.$[0].id}}&targetPlanId={{gettargetplans.response.body.$[0].id}}
Authorization: Bearer {{token}}
Content-Type: application/json

{
    "assignmentReplacements": [
        {
            "originalAssignment": "0ec151cc-bfbf-457a-95fc-0af4299f2f0e",
            "replacementAssignment": "a34bcef0-0993-4c6b-9275-5693c90f224c"
        },
        {
            "originalAssignment": "bdf82d1e-36cf-40fb-bd5e-99e1a22f793c",
            "replacementAssignment": "86254242-e02e-46e5-a45c-1a0b70adb482"
        }
    ],
    "dateAdjustment": {
        "originalReferenceDate": "2023-03-22T10:00:00Z",
        "adjustedReferenceDate": "2023-03-08T10:00:00Z",
        "replaceWithTodayDate": "2023-02-13T10:00:00+00:00"
    }
}
Here we are replacing two assigned users with two others (lines 32-41) and adjust the dates (lines 42-46). I think the format for the dates is pretty clear, but the user IDs are a bit tricky. The best way in my experience is to take a look at the assignments part in an existing plan that you fetch with a call to planDetails as explained in the previous section. A bit tedious, but it works, and I’ll improve this in a future version.
I hope this gave you an idea of how you can duplicate a plan and what the intention behind it was. If you are interested in how all this works, follow along in the next section.
The details: How this works
At it’s core, this is unchanged to my previous implementation, so ‘ll just point you at my old blog post for this :). But I had to make some changes. More on that in the next section.
The details: What I learned on the way about the .NET WASI SDK and Fermyon Spin
As I wrote above, I initially wanted to go with the Experimental WASI SDK for .NET Core created by the one and only Steve Sanderson, and that actually went quite well in the beginning following the instructions here. With some small adjustments (file watching isn’t implemented in the Wasi.AspNetCore.BundledFiles package, so I had to disable that), I could even run a Razor application. However, as I found out the hard way by getting weird error messages and not understanding at all what was happening for quite some while, outgoing networking is unfortunately not yet implemented as explained in this issue.
Because of that, I looked at Fermyon Spin again and found this blog post, introducing the Spin .NET SDK and giving some examples. As you have hopefully seen above, things already work impressively well, but of course, it is still very early for Spin and Wasm in general, so there are some rough edges that I had to work around, some with the help of a nice example repo created by Christoph Wille and the official samples repo from Fermyon. A couple of things to note, to give you an ide:
- There is no routing within a Spin component yet, so you have to write code like this (credit to Christoph!). I think this might be a design choice because every route could be its own component, but I don’t have a clear idea how that would work well in C# without unnecessarily duplicating code.
1
2
3
4
5
6
7
8
9
10
11
12
13
14
15
16
17
18
public static class Handler
{
    private delegate HttpResponse RequestHandlerDelegate(HttpRequest request);
    private static Dictionary<string, RequestHandlerDelegate> _routes = new Dictionary<string, RequestHandlerDelegate>()
    {
        { Warmup.DefaultWarmupUrl, WarmupHandler },
        { "/groups", GroupsHandler },
        { "/plans", PlansHandler },
        { "/planDetails", PlanDetailsHandler },
        { "/duplicatePlan", DuplicatePlanHandler },
        { "/echo", EchoHandler }
    };
    ...
    var requestPath = request.Headers["spin-path-info"];
    var routeFound = _routes.TryGetValue(requestPath, out var handler);

    if (routeFound && null != handler) return handler(request);
    ...
- Logging isn’t available yet, so I reused Christoph’s SpinLogger
- No Dependency Injection, so you have to create things on your own. Also because of the way Spin works, a lot of things are static, an established anti-pattern in the .NET world
- The “web basics” also aren’t there yet, so I created things like a parameter parser, default returns and success checking for outgoing calls. You can also find the code in Handler.cs and GraphResponse.cs. Not the most beautiful code in the world, but in my defense, it was a couple of very late nights ;)
1
2
3
4
5
6
7
8
9
10
11
12
13
14
15
16
17
18
19
20
21
22
23
24
25
26
27
28
29
30
31
32
33
34
35
36
37
38
39
40
41
42
43
44
45
46
47
48
49
50
51
52
53
54
55
56
57
58
59
60
61
62
63
64
65
66
67
68
69
70
71
72
73
74
75
76
77
78
79
80
81
82
83
84
85
86
87
88
89
90
91
92
93
94
95
96
97
98
99
100
101
102
103
104
public static class Handler
{
    ...
    private static HttpResponse WarmupHandler(HttpRequest request)
    {
        return new HttpResponse
        {
            StatusCode = System.Net.HttpStatusCode.OK,
            Headers = new Dictionary<string, string>
            {
                { "Content-Type", "text/plain" },
            },
            BodyAsString = "warmup",
        };
    }

    private static HttpResponse NotFound()
    {
        return new HttpResponse
        {
            StatusCode = System.Net.HttpStatusCode.NotFound
        };
    }

    private static HttpResponse OkObject(string s)
    {
        return new HttpResponse
        {
            StatusCode = System.Net.HttpStatusCode.OK,
            Headers = new Dictionary<string, string>
            {
                { "Content-Type", "text/json" },
            },
            BodyAsString = s,
        };
    }

    private static HttpResponse BadRequestString(string s)
    {
        return new HttpResponse
        {
            StatusCode = System.Net.HttpStatusCode.OK,
            Headers = new Dictionary<string, string>
            {
                { "Content-Type", "text/plain" },
            },
            BodyAsString = s,
        };
    }

    private static HttpResponse BadRequestException(Exception ex)
    {
        var statusCode = HttpStatusCode.BadRequest;
        if (ex is HttpRequestException)
        {
            var hre = ex as HttpRequestException;
            if (hre != null && hre.StatusCode != null)
                statusCode = (HttpStatusCode)hre.StatusCode;
        }
        return new HttpResponse
        {
            StatusCode = statusCode,
            Headers = new Dictionary<string, string>
            {
                { "Content-Type", "text/plain" },
            },
            BodyAsString = ex.ToString(),
        };
    }
}

static class QueryStringParser
{
    public static NameValueCollection ParsedParameters(this HttpRequest httpRequest)
    {
        var indexOfQuestionMark = httpRequest.Url.IndexOf("?");
        var url = httpRequest.Url;
        if (indexOfQuestionMark > 0)
        {
            url = url.Substring(indexOfQuestionMark + 1);
            return HttpUtility.ParseQueryString(url);
        }
        else
            return new NameValueCollection();
    }
}

public static class SuccessCheck
{
    // roughly aligned with https://github.com/microsoft/referencesource/blob/master/System/net/System/Net/Http/HttpResponseMessage.cs
    public static bool IsSuccessStatusCode(this HttpResponse response)
    {
        return ((int)response.StatusCode >= 200) && ((int)response.StatusCode <= 299);
    }

    public static HttpResponse EnsureSuccessStatusCode(this HttpResponse response)
    {
        if (!response.IsSuccessStatusCode())
        {
            throw new HttpRequestException($"{response.BodyAsString}", null, response.StatusCode);
        }
        return response;
    }
}
- Not a flaw, but a very nice design choice, that however cost me quite some time to figure out is the fact that you need to enable allowed hosts for outgoing connections in the configuration file
spin.tomllike this:
1
2
3
4
5
6
...
[[component]]
id = "planner_exandimport_wasm"
source = "bin/Release/net7.0/planner_exandimport_wasm.wasm"
allowed_http_hosts = ["https://graph.microsoft.com"]
...
I hope this gives you a bit of the feeling of where the .NET SDK is at the moment, but in all fairness, it just came out very recently and is described as “experimental”, so I really think it already is in great shape!
As I wrote in the beginning, this is more a post of my early tries and errors with .NET in Wasm, so please don’t accept things as stated here because I might very well be wrong or miss things. And if you have better ideas, please let me know :)
-
Absolutely not my invention to classify it like that, check this blog post by Docker and the original presentation by Matt Butcher, CEO of Fermyon, for more background and where this is coming from. ↩
-
We are extremely happy that our little startup is attracting people at a great rate. If you want to take a look for yourself, check our vacancies site ↩
Webmentions:
-
Thanks to #ThorstenHans, #ChristophWille, @stevensanderson, @technosophos and @docker for the inspiration, tools and sharing their work!
christophwille thorstenhans -
 Tobias Fenster
 Matt Butcher @FermyonTech


