.png)
Deploy LLMs on Azure Kubernetes Service with AI Runway
At this year’s MVP Summit, I joined a session with the one and only Brendan Burns where I first heard about AI Runway. The idea immediately caught my attention: run an LLM in your own environment, under your full control, but still with a very user-friendly experience. No mystery backend, no black box SaaS dependency, just your own Kubernetes cluster and a clean workflow.
In this post, I’ll walk through how I set this up on an Azure Kubernetes Service (AKS) cluster with the Kubernetes AI Toolchain Operator (KAITO) and Traefik traefik.
The TL;DR
If you want the short version: you can deploy an LLM on your own Kubernetes cluster in a surprisingly easy way using KAITO and AI Runway, manage it through a friendly dashboard, and expose both dashboard and model endpoints safely through Traefik with TLS.
To give you an idea, this is what the dashboard looks like:

And this is a deployment of an LLM in KAITO:
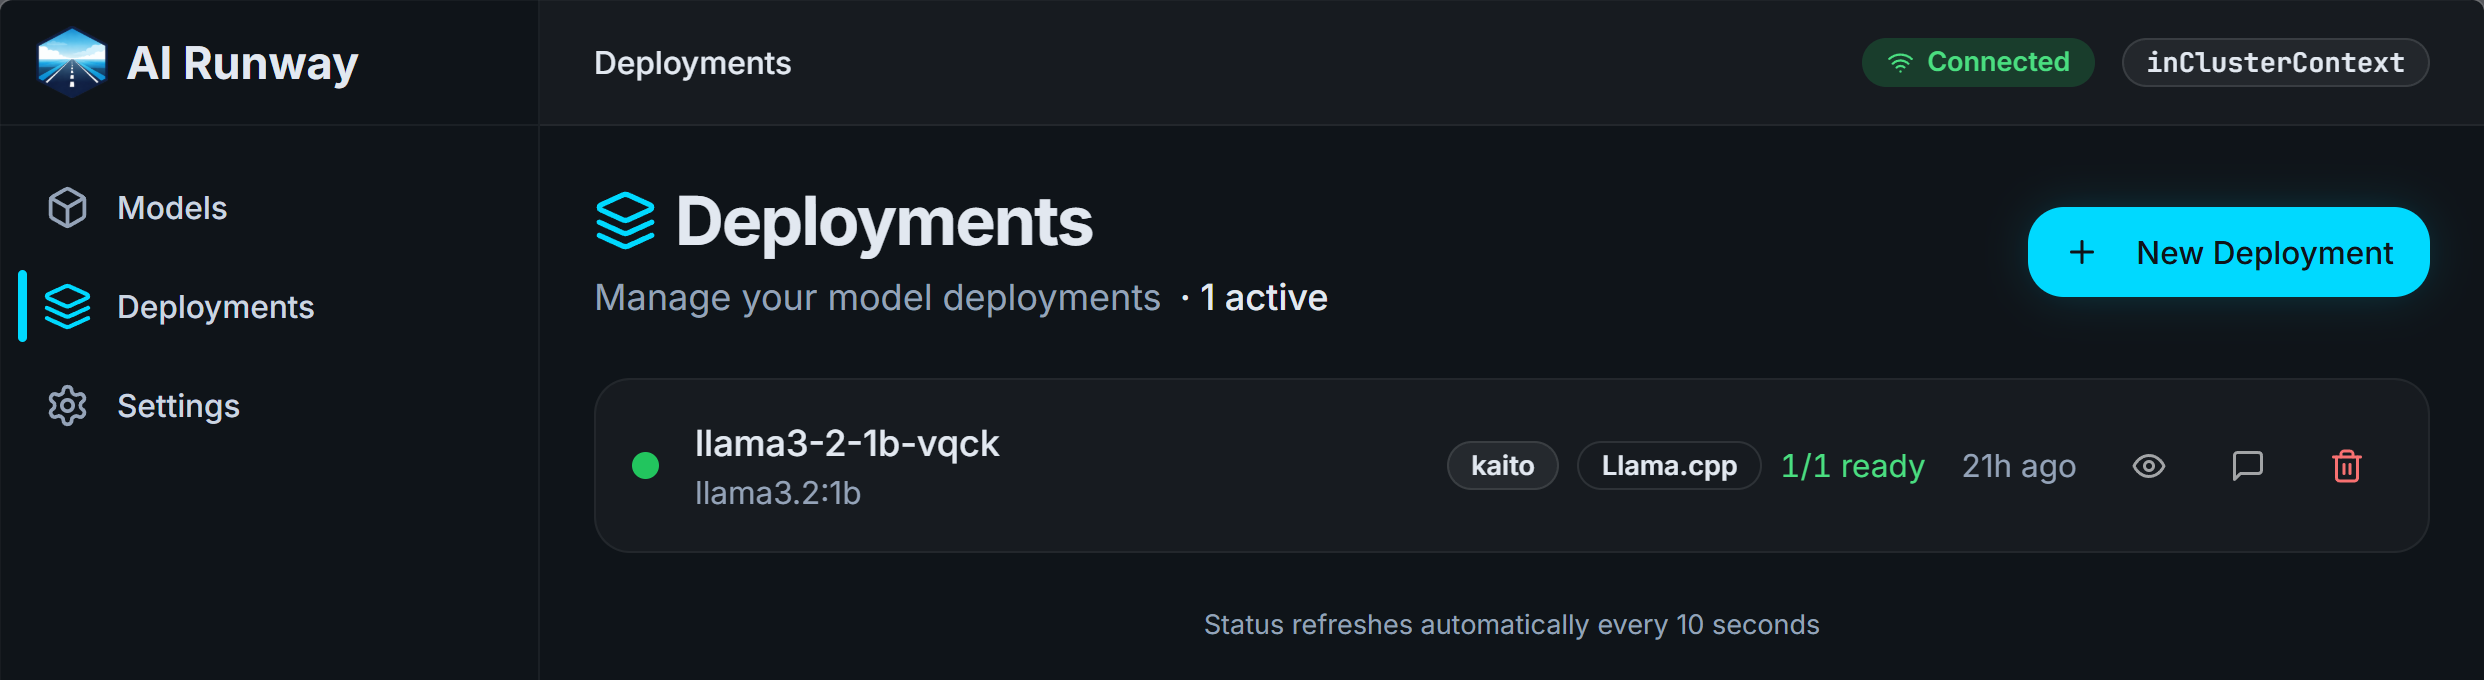
The details: Create the AKS cluster and install KAITO
Let’s start with the cluster and the AI toolchain foundation. I used these PowerShell environment variables first:
1
2
3
4
5
6
$env:AZURE_SUBSCRIPTION_ID="<your-subscription-id>"
$env:AZURE_RESOURCE_GROUP="airunway"
$env:AZURE_LOCATION="germanywestcentral"
$env:CLUSTER_NAME="cluster"
$env:DNS_LABEL="tfe-airunway"
$env:LE_EMAIL="you@example.com"
You would of course need to adjust those according to your subscription data and your preferences. Then create the resource group, AKS cluster, and a dedicated node pool for model workloads:
1
2
3
4
5
6
7
8
9
10
11
12
13
14
15
16
17
18
19
20
az group create --name $env:AZURE_RESOURCE_GROUP --location $env:AZURE_LOCATION

az aks create \
	--location $env:AZURE_LOCATION \
	--resource-group $env:AZURE_RESOURCE_GROUP \
	--name $env:CLUSTER_NAME \
	--enable-oidc-issuer \
	--generate-ssh-keys

az aks nodepool add \
	--resource-group $env:AZURE_RESOURCE_GROUP \
	--cluster-name $env:CLUSTER_NAME \
	--name models \
	--node-count 1 \
	--min-count 1 \
	--max-count 10 \
	--node-vm-size Standard_D8ds_v5 \
	--enable-cluster-autoscaler

az aks get-credentials --resource-group $env:AZURE_RESOURCE_GROUP --name $env:CLUSTER_NAME --overwrite-existing
Note that we are using the Standard_D8ds_v5 VM size which includes only CPUs and no GPUs because I couldn’t get any VMs with GPUs at the moment on Azure for my dev/test subscription. But KAITO can also run CPU-only models.
With the cluster in place, install KAITO:
1
2
3
4
5
helm repo add kaito https://kaito-project.github.io/kaito/charts/kaito
helm install kaito-workspace kaito/workspace \
	--namespace kaito-workspace \
	--create-namespace \
	--set featureGates.disableNodeAutoProvisioning=true
That gives you the Kubernetes-native model management layer we need for the next steps.
The details: Add AI Runway and expose the dashboard through Traefik
Next, install AI Runway itself:
1
2
3
kubectl apply -f https://raw.githubusercontent.com/kaito-project/airunway/main/deploy/controller.yaml
kubectl apply -f https://raw.githubusercontent.com/kaito-project/airunway/main/deploy/dashboard.yaml
kubectl apply -f https://raw.githubusercontent.com/kaito-project/airunway/refs/heads/main/providers/kaito/deploy/kaito.yaml
To make the dashboard available from the internet, I installed Traefik and configured ACME/Let’s Encrypt:
1
2
3
4
5
6
7
8
9
10
11
12
13
14
15
16
17
18
19
20
21
22
23
24
25
26
27
28
29
30
31
32
33
34
35
36
37
helm repo add traefik https://traefik.github.io/charts
helm repo update

@"
ingressClass:
	enabled: true
	isDefaultClass: false
	name: traefik

providers:
	kubernetesIngress:
		enabled: true
	kubernetesGateway:
		enabled: false
	kubernetesCRD:
		enabled: true

logs:
	access:
		enabled: true
		format: common

service:
	annotations:
		service.beta.kubernetes.io/azure-dns-label-name: $env:DNS_LABEL

additionalArguments:
	- --certificatesresolvers.le.acme.email=$env:LE_EMAIL
	- --certificatesresolvers.le.acme.storage=/data/acme.json
	- --certificatesresolvers.le.acme.tlschallenge=true
	- --certificatesresolvers.le.acme.httpchallenge=true
	- --certificatesresolvers.le.acme.httpchallenge.entrypoint=web
"@ | helm upgrade --install traefik traefik/traefik `
	--namespace traefik `
	--create-namespace `
	--wait --timeout 10m `
	-f -
And this Ingress publishes the AI Runway dashboard:
1
2
3
4
5
6
7
8
9
10
11
12
13
14
15
16
17
18
19
20
21
22
23
24
25
26
27
@"
apiVersion: networking.k8s.io/v1
kind: Ingress
metadata:
	name: dashboard-ingress
	namespace: airunway-system
	annotations:
		traefik.ingress.kubernetes.io/router.entrypoints: websecure
		traefik.ingress.kubernetes.io/router.tls: "true"
		traefik.ingress.kubernetes.io/router.tls.certresolver: le
spec:
	ingressClassName: traefik
	tls:
	- hosts:
		- $env:DNS_LABEL.$env:AZURE_LOCATION.cloudapp.azure.com
	rules:
	- host: $env:DNS_LABEL.$env:AZURE_LOCATION.cloudapp.azure.com
		http:
			paths:
			- path: /
				pathType: Prefix
				backend:
					service:
						name: airunway
						port:
							number: 80
"@ | kubectl apply -f -
Now you can open the dashboard as is visible in the screenshot above and start deploying models from the UI.
The details: Deploy your first model, expose it, and test over HTTP
From the AI Runway dashboard, deploy llama3.2:1b first. Once it is running, expose the model service via Traefik as well. I used a middleware to strip an /openai prefix so the backend receives the expected path and because that is the way Microsoft Foundry exposes models.
Update: If you want a better, more flexible way to implement network access to the models, check this later blog post
1
2
3
4
5
6
7
8
9
10
11
12
13
14
15
16
17
18
19
20
21
22
23
24
25
26
27
28
29
30
31
32
33
34
35
36
37
38
@"
apiVersion: traefik.io/v1alpha1
kind: Middleware
metadata:
	name: strip-openai
	namespace: kaito-workspace
spec:
	stripPrefix:
		prefixes:
			- /openai
---
apiVersion: networking.k8s.io/v1
kind: Ingress
metadata:
	name: llm-ingress
	namespace: kaito-workspace
	annotations:
		traefik.ingress.kubernetes.io/router.entrypoints: websecure
		traefik.ingress.kubernetes.io/router.tls: "true"
		traefik.ingress.kubernetes.io/router.tls.certresolver: le
		traefik.ingress.kubernetes.io/router.middlewares: kaito-workspace-strip-openai@kubernetescrd
spec:
	ingressClassName: traefik
	tls:
	- hosts:
		- $env:DNS_LABEL.$env:AZURE_LOCATION.cloudapp.azure.com
	rules:
	- host: $env:DNS_LABEL.$env:AZURE_LOCATION.cloudapp.azure.com
		http:
			paths:
			- path: /openai
				pathType: Prefix
				backend:
					service:
						name: llama3-2-1b-vqck
						port:
							number: 80
"@ | kubectl apply -f -
Finally, a first HTTP test against the OpenAI-compatible API endpoint:
1
2
3
4
5
6
7
8
9
10
11
12
POST https://tfe-airunway.germanywestcentral.cloudapp.azure.com/openai/v1/chat/completions
Content-Type: application/json

{
	"model": "llama-3.2-1b-instruct",
	"messages": [
		{
			"role": "user",
			"content": "generate a powershell script to recursively analyze the size of my home folder to a maximum depth of 5 levels"
		}
	]
}
The response will look something like this
1
2
3
4
5
6
7
8
9
10
11
12
13
14
15
16
17
18
19
20
21
22
23
24
25
26
27
28
HTTP/1.1 200 OK
Content-Type: application/json
Date: Tue, 31 Mar 2026 19:43:37 GMT
X-Correlation-Id: b3916e7e-b077-437a-bbbc-59c966d20c9e
Connection: close
Transfer-Encoding: chunked

{
  "created": 1774986196,
  "object": "chat.completion",
  "id": "14e7cc35-e81a-4616-bbce-70067f2a324e",
  "model": "llama-3.2-1b-instruct",
  "choices": [
    {
      "index": 0,
      "finish_reason": "stop",
      "message": {
        "role": "assistant",
        "content": "Here is a PowerShell script that recursively analyzes the size of your home folder to a maximum depth of 5 levels:\n```powershell\n# Get the current user's home directory\n$homeDir = Get-Location\n\n# Set the maximum depth\n$maxDepth = 5\n\n# Define the recursion function\nfunction Get-Size {\n    param ($path)\n\n    # Get the file count\n    Get-ChildItem -Path $path -Recurse | Measure-Object\n\n    # Get the size of each item\n    Get-ChildItem -Path $path | ForEach-Object {\n        Get-Size $_.FullName\n        Write-Host \"  \"\n        $itemSize = $_.Size\n        Write-Host $itemSize\n    }\n}\n\n# Call the function with the home directory\nGet-Size $homeDir\n```\nLet me explain what this script does:\n\n1. It gets the current user's home directory.\n2. It sets the maximum depth of the recursion to 5 levels.\n3. It defines a function `Get-Size` that takes a path as input and performs the following steps:\n\t* Gets the file count using `Get-ChildItem`.\n\t* Gets the size of each item using `Get-ChildItem` and `Measure-Object`.\n\t* Prints the size of each item, prefixed with a column of hyphens to indicate the depth of the item.\n4. Finally, the script calls the `Get-Size` function with the current user's home directory.\n\nTo use this script, simply copy and paste it into PowerShell, and it will recursively analyze the size of your home folder to a maximum depth of 5 levels. The output will be something like this:\n```\n    -Size:\n        100KB\n        4KB\n        800KB\n        4KB\n        800KB\n        4KB\n        800KB\n    -\n    -Size:\n        100KB\n        4KB\n        800KB\n        4KB\n        800KB\n        4KB\n        800KB\n    -\n    -Size:\n        100KB\n        4KB\n        800KB\n        4KB\n        800KB\n        4KB\n        800KB\n    -\n    -Size:\n        100KB\n        4KB\n        800KB\n        4KB\n        800KB\n        4KB\n        800KB\n    -\n    -Size:\n        100KB\n        4KB\n        800KB\n        4KB\n        800KB\n        4KB\n        800KB\n    -\n    -Size:\n        100KB\n        4KB\n        800KB\n        4KB\n        800KB\n        4KB\n        800KB\n    -\n    -Size:\n        100KB\n        4KB\n        800KB\n        4KB\n        800KB\n        4KB\n        800KB\n    -\n    -Size:\n        100KB\n        4KB\n        800KB\n        4KB\n        800KB\n        4KB\n        800KB\n```\nNote that this script will not be suitable for very large home directories, as it can take a significant amount of time to run. Also, be careful when running this script, as it will modify the file system of the current user."
      }
    }
  ],
  "usage": {
    "prompt_tokens": 33,
    "completion_tokens": 731,
    "total_tokens": 764
  }
}
This is what I really like about the setup: from zero to a working, externally reachable LLM endpoint with a proper dashboard and your own infrastructure control in a short amount of time.
The details: Using it with Business Central
I tried to set up the OpenAI integration in Microsoft Dynamics 365 Business Central as shown in the BC Tech sample for that topic, but that doesn’t work. I even don’t see a request coming in, so it looks to me like BC is somehow validating that it takes to Microsoft Foundry and not something that looks very similar. A pity…
But as I showed before, we can use the Business Central MCP Server e.g. in VS Code. You can configure your model there as “OpenAI compatible” like this:
1
2
3
4
5
6
7
8
9
10
11
12
13
14
15
    {
        "name": "AI Runway",
        "vendor": "customoai",
        "models": [
            {
                "id": "llama-3.2-1b-instruct",
                "name": "LLaMA 3.2:1B",
                "url": "https://tfe-airunway.germanywestcentral.cloudapp.azure.com/openai",
                "toolCalling": true,
                "vision": false,
                "maxInputTokens": 128000,
                "maxOutputTokens": 16000
            }
        ]
    }
With this in place and an MCP configuration like explained in the previous blog post, you can experiment with the BC MCP and the capabilities of different models. While e.g. the model I used above is quite small, it gave surprisingly good results in this context, but depending on what you want to achieve, your response might of course be different.
Webmentions:
No webmentions were found.


No reposts were found.