.png)
Serverless development of an Azure Functions app with a GitHub Codespace
“Serverless” is probably one of the most used (and abused) buzzwords in the Software industry these days, and my favorite quote on that is: “There are as many servers in serverless as there are cars in taxi driving. Just because it isn’t your server, and you don’t manage it, doesn’t mean there isn’t one”. So, I think it is a bit of a misleading term, but of course I understand the benefit of not having to own, set up and maintain infrastructure. Recently, serverless ideas have also popped up on the development side of things. What I want to show you in this blog post is how you can serverlessly create and deploy one of the popular serverless offerings in the Microsoft ecosystem, Azure Functions, by using a GitHub Codespace.
The TL;DR
The steps to get us there are surprisingly easy:
- Create a new repository in GitHub
- Create a Codespace for this repo and add Azure Functions & PowerShell devcontainer config files
- Wait until it has been created and then create the Azure Functions project and function with an http trigger
- Create an Azure Function App on Azure and deploy your Azure Function into the App
- Test and have fun!
Here is what it looks like in a walkthrough, with some fast forwarding:
This gives you the basics: An Azure Function that reacts on GET requests and a deployment path from VS Code. All created without any local development tooling, just with a browser. And of course, maintenance and improvement can be done from there as well! If you want to know how to interact securely with other Azure services, check the details sections.
The Details: Authentication against other Azure Services (and running the Azure Function locally)
Sometimes, you will create an Azure Function that works just on its own. But chances are that it will need to interact with other services. My example is an Azure Function that returns the power state of an Azure VM. To give you an idea, this is what a request and response will look like:
1
2
3
4
5
6
7
8
9
10
11
12
13
14
15
16
17
GET https://azfunc-codespace-demo.azurewebsites.net/api/HttpTrigger1?vmname=devtfe2

HTTP/1.1 200 OK
Connection: close
Content-Type: application/json; charset=utf-8
Date: Sun, 24 Jul 2022 17:41:10 GMT
Content-Encoding: gzip
Transfer-Encoding: chunked
Vary: Accept-Encoding
Request-Context: appId=cid-v1:a611792e-9959-48fe-be73-61a928fb7b97

{
  "PowerState": "VM deallocated",
  "Id": "/subscriptions/94670b10-18d0-4e17-bcfe-e01f701be9ff/resourceGroups/DEVTFE2/providers/Microsoft.Compute/virtualMachines/devtfe2",
  "VmId": "3856a9c1-00dd-4575-8075-582331676c07",
  "Name": "devtfe2"
}
There are multiple options set up the permissions for such a scenario, but my favorite one is to give the Azure Function a Managed Identity. The docs provide a very nice explanation for that mechanism:
A common challenge for developers is the management of secrets, credentials, certificates, and keys used to secure communication between services. Managed identities eliminate the need for developers to manage these credentials.
… Managed identities provide an automatically managed identity in Azure Active Directory for applications to use when connecting to resources that support Azure Active Directory (Azure AD) authentication. Applications can use managed identities to obtain Azure AD tokens without having to manage any credentials.
You can understand this as if you assign a “user” to the Azure Function and then later give that user access to the Azure resources that it needs. To enable the Azure Function to read the VM information of my example scenario, I have given it read access to the full Azure subscription. Of course, your scenario will most likely be different and fully depends on whatever you are doing in your Azure Function. By default, an Azure Function doesn’t have a Managed Identity, but you can easily enable it by going to your Function App and selecting the “Identity” entry below “Settings”. There, you can enable it by setting “Status” to “On”.
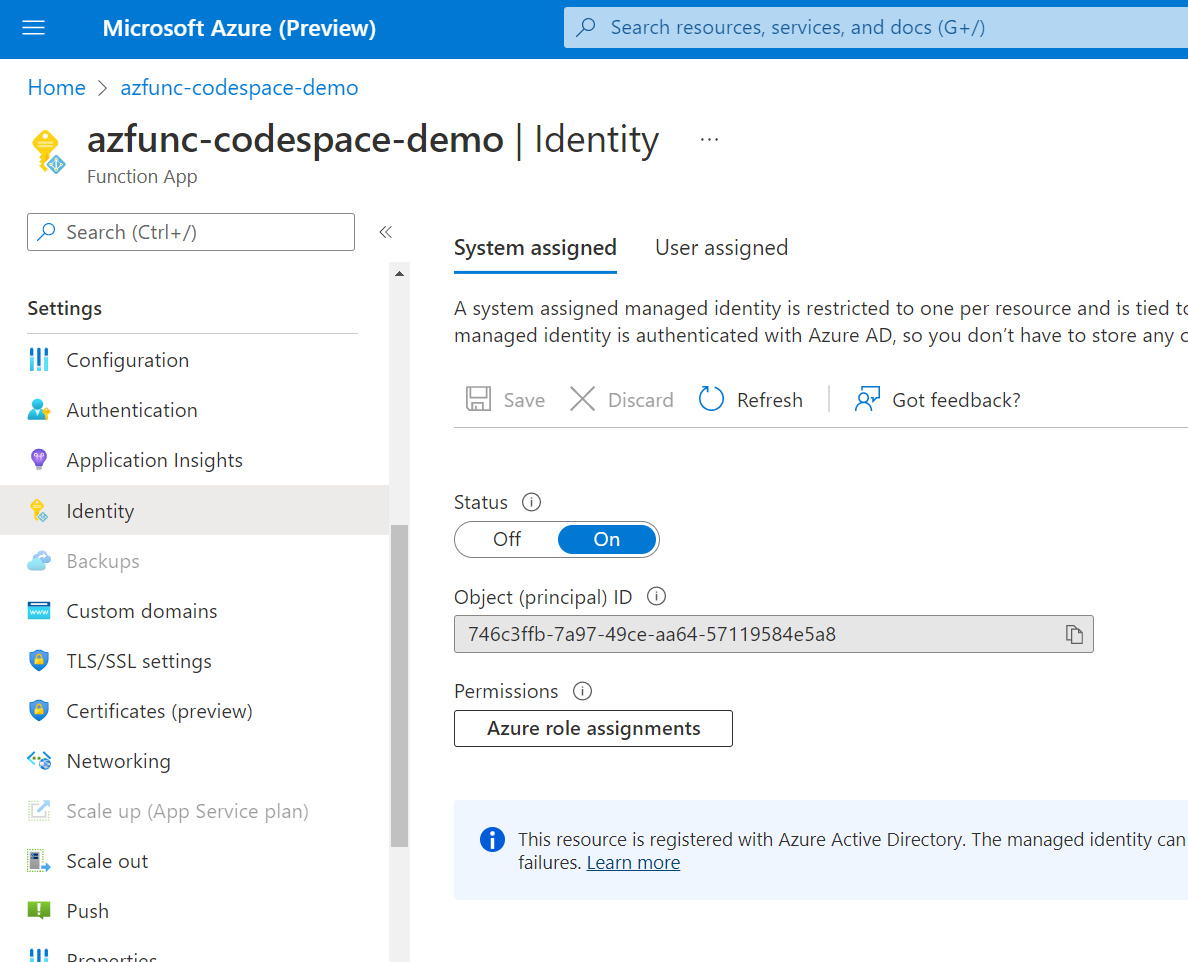
Then you can click on “Azure role assignments” and give the Managed Identity and therefore the Azure Function the required permissions.
Now that we have the permissions in place, we can use those permissions in the Azure Function. For that, we need to call a special endpoint, whose URL is shared within in the Azure Function as an environment variable IDENTITY_ENDPOINT and it needs a special header, where the value is also available as environment variable. The code to get an access token and client id, which we will need when logging in to our Azure account, looks like this:
1
2
3
4
5
$resourceURI = "https://management.core.windows.net/"
$tokenAuthURI = $env:IDENTITY_ENDPOINT + "?resource=$resourceURI&api-version=2019-08-01"
$tokenResponse = Invoke-RestMethod -Method Get -Headers @{"X-IDENTITY-HEADER" = "$env:IDENTITY_HEADER" } -Uri $tokenAuthURI
$accessToken = $tokenResponse.access_token
$clientId = $tokenResponse.client_id
With that information, we can log in and get the power state of a VM:
1
2
Connect-AzAccount -AccessToken $accessToken -AccountId $clientId | Out-Null
$body = Get-AzVM -VMName "$vmname" -Status | Select-Object powerstate, id, vmid, name
Depending on whether we get a response, we can either return a status code of NotFound a.k.a. HTTP 404 or we return a status code of OK with the VM information as body:
1
2
3
4
5
6
7
8
9
10
11
12
13
if ($null -eq $body) {
    Write-Host "no response"
    Push-OutputBinding -Name Response -Value ([HttpResponseContext]@{
            StatusCode = [HttpStatusCode]::NotFound
        })
}
else {
    Write-Host "Success"
    Push-OutputBinding -Name Response -Value ([HttpResponseContext]@{
            StatusCode = [HttpStatusCode]::OK
            Body       = $body
        })
}
If you want to check the full sources, you can find them here.
Maybe you clone this repo, or you go through the steps by yourself, and then you will see that you can also run the Azure Function locally for easy testing during your development (just hit F5…). Given that we are running inside a GitHub Codespace, we can’t just access localhost, but fortunately Codespace automatically provides an Azure-based URL which you can use to access whatever would otherwise be available on localhost. But then, our Managed Identity based approach to authentication and permissions as outlined above won’t work anymore, because we aren’t in the context of the Azure Function if it runs “locally” in the Codespace. To solve that, I am adding an access token and client id into a file called local.settings.json, which is used to define environment variables when it runs locally already has other settings:
1
2
3
4
5
6
7
8
9
10
{
  "IsEncrypted": false,
  "Values": {
    "AzureWebJobsStorage": "",
    "FUNCTIONS_WORKER_RUNTIME_VERSION": "~7",
    "FUNCTIONS_WORKER_RUNTIME": "powershell",
    "accesstoken": "eyJ0eXAiOiJK...FSZHsUFISd6EuQQOQbdCgA",
    "clientid": "tobias.fenster@arssolvendi.onmicrosoft.com"
  }
}
Obviously, the access token is abbreviated… If you don’t know how to get an access token, just go to https://shell.azure.com, select PowerShell and call this little command, which will give you an access token:
(Get-AzAccessToken -ResourceUrl "https://management.core.windows.net/").Token
If you put that into the local.settings.json file, you can run the Azure Function locally and test, because it first checks whether those environment variables are defined, and only calls the identity endpoint if not:
1
2
3
4
5
6
7
8
9
10
$accessToken = ""
$clientId = ""
if (Test-Path env:\accesstoken) {
    $accessToken = $env:accesstoken
    $clientId = $env:clientid
}
else {
    $resourceURI = "https://management.core.windows.net/"
    ... as seen above ...
}
Certainly not the only way to properly handle authentication and permissions in an Azure Function, but works very well for me with the additional benefit of also working locally or in a Codespace.
Webmentions:
No webmentions were found.


No reposts were found.