.png)
Develop Azure DevOps extensions
Since around 2013 I am using Azure DevOps or at that time Team Foundation Server. I wasn’t a huge fan in the early days, but it has gotten continuously better and is now at a point where it is in my opinion a very good all-around solution for all the key aspects of developing software, but also has the ability to be used for other scenarios. While GitHub is gaining traction as the leading source control / CI/CD platform by Microsoft, especially the Boards part is far and away better in Azure DevOps. It already brings a ton of functionality and is heavily customizable, but it also has a great extensibility model. However, getting started with extending Azure Boards can be a bit of a pain because the documentation is quite scattered, and you find a lot of out-dated information. On top of that, the tool chain is somewhat heterogeneous, which also doesn’t help. As I recently had to create a PoC extension (for time tracking in Azure DevOps, sending data directly to our ERP), I once again struggled with putting all the parts together, although I had done it a couple of times before. Because of that, I decided to put a very easy to set up and use package together, that allows you to get a working Azure DevOps web extension with only very few setup steps, targeted at the Boards part and covering the - in my experience - most relevant scenarios.
The TL;DR
My sample has a backend, which just returns data, but helps to understand how you would access any backend, including authorization. It also of course has a frontend that will be shown to the enduser implemented in React, which shows how to listen for changes in a WorkItem, connect to the backend and make changes to the WorkItem. I wanted to avoid relying on locally installed SDKs and versions, so I put everything in a VS Code dev container. Assuming that you already have WSL2 and the VS Code remote container extension installed, this is what you need to do:
- Use VS Code to clone my repo into a container by running the “Remote-containers: Clone repository in Container volume” action. It will ask you if you want to open the workspace in that folder, which you should do.
- Replace
<put-your-publisher-here>in two places infrontend/vss-extension.jsonwith your marketplace publisher id. If you don’t have one, create one following the documentation - Run
npm iin the frontend folder to install all node modules. - Run
npm run publishin the frontend folder. This will publish the extension to the Visual Studio marketplace, which is also used by Azure DevOps, so that we can use it. You will have to enter a Personal Access Token with the right permissions. If you aren’t sure what that is or what the right permissions are, again, follow the docs - Go to the Visual Studio marketplace management portal and share your extension with your organization as explained here
- While we are here, also download the certificate from the same dropdown and enter the value into backend -> .vscode -> launch.json, replacing
<put-your-key-here> - Go to the organization settings the organization that you used in the previous step and install the extension
- Go back to VS Code and start the “Start backend” debug configuration to start the backend, do the same with “Start frontend” to start the frontend and also with “Start firefox” to start firefox (because Chrome / Edge can’t debug iframes). If you see an error like “can’t find task ‘build’”, then you might have to reload the VS Code window once and try again.
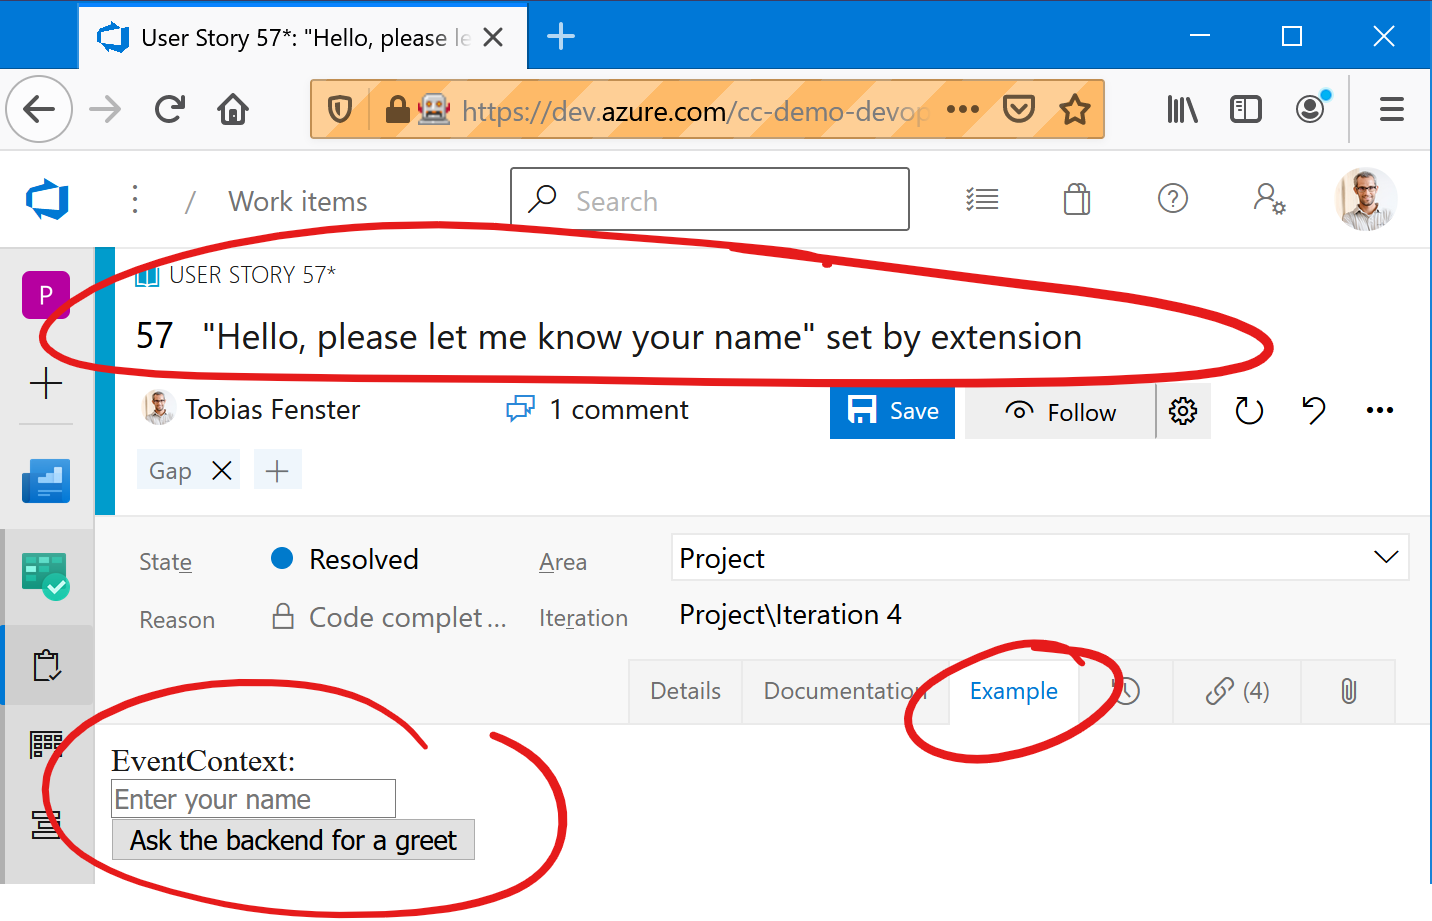
- In Firefox you will see an error that the page can’t be trusted. This is because we are using a self-signed certificate. You need to use “Advanced” -> “Accept the Risk and Continue” to accept the certificate for this dev scenario. Afterwards, go to a WorkItem in the organization where you installed the extension. It will have an “Example” tab, go there.
- Set a breakpoint somewhere in frontend -> src -> example -> example.tsx, e.g. in line 97 to track the backend call. Also set a breakpoint in backend -> Controllers -> ExampleController.cs, e.g. in line 24 to track the request.
- Click on “Ask the backend for a greeting” in Azure DevOps. This should first allow you to debug the frontend when the breakpoint hits and then in the next step the backend
- As a bonus, make a change in the frontend, e.g. in the button label in line 86 in example.tsx and see how the extension automatically reloads with your change.
To give you an idea, this is what the result in Azure DevOps should look like after you have loaded the extension and clicked the provided button once:
With that, you have an environment in place which you can use to develop an Azure DevOps extension with easy debugging and hot reload. Please keep in mind that this is intended only for dev and maybe PoC scenarios, not for production. But if you want only a quick and easy1 ramp up, this should be good.
The details: The dev container
As the backend of my sample is written in C# (.NET) and the frontend is React / TypeScript, I need C# and Node.js in my dev container. The standard C# (.NET) container already allows you to easily enable the addition of Node.js through a configuration setting (s. docs), so there wasn’t a lot that I needed to do. I added GitLens (because it’s amazing) and the Firefox debugger as additional extensions and a couple of npm packages. Again, to make the usage easier, I just put frontend and backend into the same workspace and the same container. If you open it, you will find three “folders” in the workspace: One for the C# backend, one for the React frontend and one for the devcontainer files.
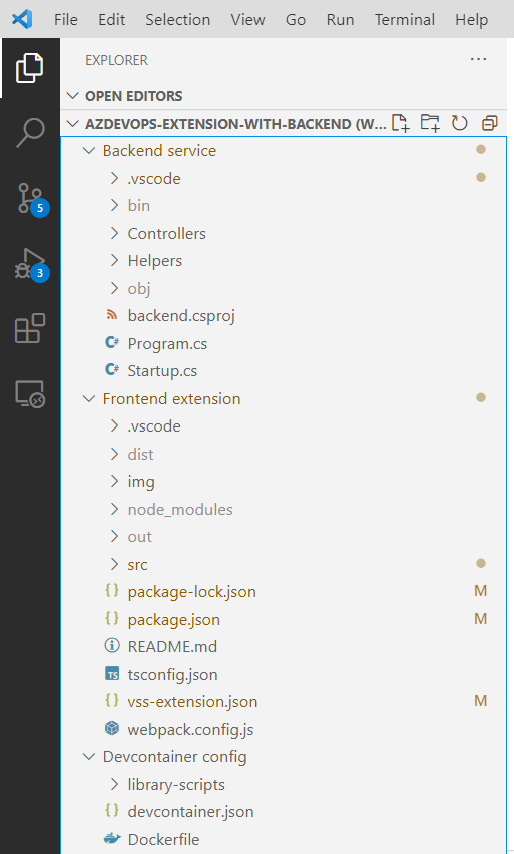
The actual root folder of the repo contains only the .gitignore file, the workspace definition file and the mandatory README.md
The details: The frontend
The frontend is built using React and if you never used that, it might be a bit confusing. In that case, I would suggest the great official beginners tutorial. The interesting parts from an Azure DevOps extension point of view are:
- Getting access to the SDK, e.g. to register event listeners: This is done via
SDK.init(), probably best put incomponentDidMount()of your React component. Once you have it initialized, you can register your listeners. I am only showing two (onFieldChangedandonLoaded), but you can find the full registration here.
1
2
3
4
5
6
7
8
9
10
11
12
13
14
15
16
17
18
public componentDidMount() {
    SDK.init().then(() => {
        SDK.register(SDK.getContributionId(), () => {
            return {
                // Called when the active work item is modified
                onFieldChanged: (args: IWorkItemFieldChangedArgs) => {
                    this.setState({
                        eventContent: `onFieldChanged - ${JSON.stringify(args)}`
                    });
                },

                // Called when a new work item is being loaded in the UI
                onLoaded: (args: IWorkItemLoadedArgs) => {
                    this.setState({
                        eventContent: `onLoaded - ${JSON.stringify(args)}`
                    });
                },
...
- To make the backend call, I am using the popular axios npm package in a very standard way, but the authorization is more interesting: A call to
SDK.getAppToken()returns the right token, which is then used in the headers of the axios call for authorization. The backend part is explained in the backend details below.
1
2
3
4
5
6
const appToken = await SDK.getAppToken();
const response = await axios.get(`http://localhost:5000/Example?name=${this.state.name}`, {
    headers: {
        'Authorization': `Bearer ${appToken}`
    }
});
- The last topic specific to Azure DevOps extensions is access to SDK service, e.g. one to interact with WorkItems: A call to
SDK.getService<IWorkItemFormService>(WorkItemTrackingServiceIds.WorkItemFormService)gives us the right service, which is then used to set the value of a field in the WorkItem. The full documentation for the Azure DevOps Extension API and SDK packages is here
1
2
3
4
5
6
7
const workItemFormService = await SDK.getService<IWorkItemFormService>(
    WorkItemTrackingServiceIds.WorkItemFormService
);
workItemFormService.setFieldValue(
    "System.Title",
    `"${response.data}" set by extension`
);
The rest is standard React and Typescript code. I also tried to use the azure-devops-ui package, but as on previous occasions failed at making it pick up the right styles. If you have been able to successfully use that, please let me know how…
The details: The backend
The backend is fairly trivial as it only has one controller which only has one Get method, implemented in one line
1
public string Get(string name) => string.IsNullOrEmpty(name) ? "Hello, please let me know your name" : $"Hello {name}!";
Doesn’t get a lot more simplified than that… However, the Authorization part is somewhat interesting. Basically, you use the SDK in the frontend to get an access token (see the frontend details above), which is automatically signed with a key which is unique for your extension. To validate that key, you have to use the certificate from the extension management portal (see the TL;DR above). That way, you can make sure in your backend, that a call is coming from your extension in the frontend. The source code is more or less identical to the official documentation on the topic, so I won’t go into details, but you can find it here. The sole special line is the usage of the right IssuerSigningKey when validating the token:
1
2
3
4
5
TokenValidationParameters validationParameters = new TokenValidationParameters
{
    IssuerSigningKey = new SymmetricSecurityKey(Encoding.UTF8.GetBytes(EXTENSION_SIGNING_KEY)),
    ...
};
The details: Sources
As I wrote in the beginning, the whole documentation around the topic of Azure DevOps extensions is somewhat scattered, but those are the sources that I used and put together for my “all-in-one” sample:
- Basic extension sample including how to listen for events: https://github.com/microsoft/azure-devops-extension-sample/
- Setup for hot reload and debug: https://github.com/microsoft/azure-devops-extension-hot-reload-and-debug
- Authentication information: https://docs.microsoft.com/en-us/azure/devops/extend/develop/auth?view=azure-devops
I hope this helps for making your first steps towards your own Azure DevOps web extension!
-
It actually might look complicated, but if you start from scratch or follow the official docs, it very likely will take you a lot longer… ↩
Webmentions:
 Michael Zettl
 Tobias Fenster
 phenno


