.png)
Creating a BC only container image
I sometimes take half a look at at the bccontainerhelper issues and recently one caught my eye: Question: How to create a [Business Central] “service only” container, by KristofKlein. Not a problem I have, to be honest, but an interesting thought experiment. After checking the sources of the BC container image, the answer was relatively straightforward: Set some environment parameters on startup and neither SQL nor the WebClient will be started. But then jonaswre added another wrinkle: Can we not only make sure that SQL and WebClient aren’t started but also that they aren’t installed?
The TL;DR
With a few changes to the source of the generic BC container image, we can make the installation of SQL and WebClient optional, and ensure that the startup scripts don’t try to interact with them. With these changes, we can build a suitable generic image and just use bccontainerhelper to create a specific image based on our generic:
New-BcImage -artifactUrl (Get-BCArtifactUrl -type OnPrem -country de -version 23.0) -baseImage mygeneric:1.1.0.0 -imageName mybc
Now we can create a container from our specific image, which has only BC and nothing else:
docker run -e accept_eula=y -e accept_outdated=y `
           -e databaseUserName=sa -e databasePassword=Super5ecret! -e databaseServer=sqlserver -e databaseInstance= -e databaseName=CronusDE `
           -e webClient=N -e httpSite=N -e username=admin -e password=Super5ecret! -e usessl=n `
           --name=bc mybc:onprem-23.0.12034.12841-de
This container has only BC installed and running, no IIS / WebClient or SQL
The details: The scenario
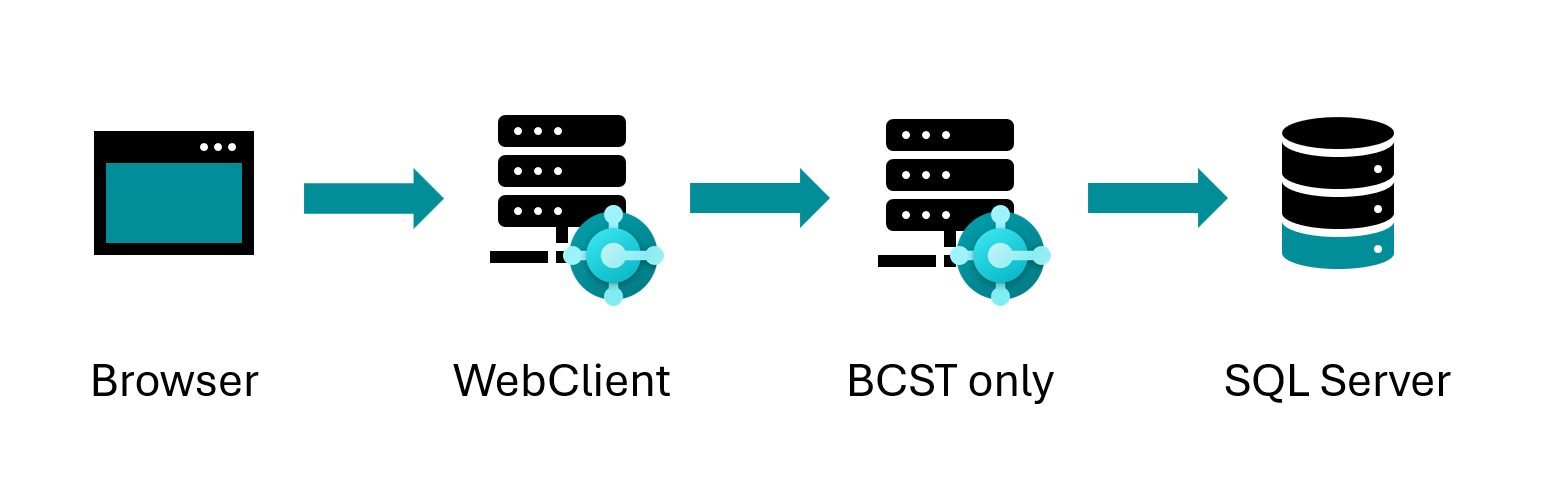
The scenario I want to show you is how to use a SQL container and connect our BC-only container. To validate that everything works, we will also connect a “normal” BC container, but only the WebClient, to the BC-only container. Basically, a good old fully distributed 3-tier installation scenario.
Of course, if you already have the SQL backend and a WebClient frontend, you only need the BC-only container in between.
The details: Preparing a database
The first step is to get a database. Since we will be using a “normal” BC container later, the easiest way is to just start that and get the database files. As a prerequisite, we need an image, so let’s use bccontainerhelper to create it and then run a container:
New-BcImage -artifactUrl (Get-BCArtifactUrl -type OnPrem -country de -version 23.0) -imageName standardbc
docker run -e accept_eula=y -e accept_outdated=y -e username=admin -e password=Super5ecret! `
       -v "$(Get-Location):c:\databasecopy" --name=bc --rm standardbc:onprem-23.0.12034.12841-de
Now we can get a session into the container, stop the SQL Server and copy the database files into the local folder that we mounted into the container with the -v "$(Get-Location):c:\databasecopy" parameter. Then we exit and stop the container, which will also be removed due to the --rm parameter.
docker exec -ti bc powershell
Stop-Service 'MSSQL$SQLEXPRESS'
copy .\databases\* .\databasecopy\
exit
docker stop bc
Now we have the database files that we will need in a second
The details: SQL Server and attaching the database
We are going to use docker compose, so I will show you the snippets for all three tiers and bring them together in the end. For the SQL Server, we will use a container based on an image that I maintain:
1
2
3
4
5
6
7
8
  sql:
    image: tobiasfenster/mssql-server-dev-unsupported:2019-latest
    environment:
      - accept_eula=y
      - sa_password=Super5ecret!
      - attach_dbs=[{"dbName":"Demo Database BC (23-0)","dbFiles":["c:\\databases\\Demo Database BC (23-0)_Data.MDF","c:\\databases\\Demo Database BC (23-0)_Log.LDF"]}]
    volumes:
      - .:c:/databases/
You can see the image name, the accepted EULA, the SA user password and then how we can instruct the SQL Server in the container to attach our database files. Finally, you see how we share the current host folder into the container folder c:\databases.
The details: The BC-only container
As mentioned above, to get our BC-only container, we first need our custom generic image, because this is where SQL and IIS / WebClient are installed for the BC container image. The changes we need to make are first in the Dockerfile where we add an additional argument bcOnly that blocks the install script if true (lines 8, 9, 16 and 78).
1
2
3
4
5
6
7
8
9
10
11
12
13
14
15
16
17
18
19
20
21
22
23
24
25
26
27
28
29
30
31
32
33
34
35
36
37
38
39
40
41
42
43
44
45
46
47
48
49
50
51
52
53
54
55
56
57
58
59
60
61
62
63
64
65
66
67
68
69
70
71
72
73
74
75
76
77
78
ARG baseimage

FROM $baseimage

ARG created
ARG tag
ARG osversion
ARG bcOnly
ENV bcOnly=$bcOnly

SHELL ["powershell", "-Command", "$ErrorActionPreference = 'Stop'; $ProgressPreference = 'SilentlyContinue';"]

# Install the prerequisites first to be able reuse the cache when changing only the scripts.
# Temporary workaround for Windows DNS client weirdness (need to check if the issue is still present or not).

RUN if ('true' -ne $env:bcOnly) { \
    Add-WindowsFeature Web-Server,web-AppInit,web-Asp-Net45,web-Windows-Auth,web-Dyn-Compression,web-WebSockets; \
    Stop-Service 'W3SVC' ; \
    Set-Service 'W3SVC' -startuptype manual ; \
    Set-ItemProperty -Path 'HKLM:\SYSTEM\CurrentControlSet\Services\Dnscache\Parameters' -Name ServerPriorityTimeLimit -Value 0 -Type DWord; \
    Set-ItemProperty -Path "HKLM:\system\CurrentControlSet\control" -name ServicesPipeTimeout -Value 300000 -Type DWORD -Force; \
    Invoke-WebRequest -Uri 'https://bcartifacts.blob.core.windows.net/prerequisites/SQLEXPR2019_X64_ENU.EXE' -OutFile sqlexpress.exe ; \
    Start-Process -Wait -FilePath .\sqlexpress.exe -ArgumentList /qs, /x:setup ; \
    .\setup\setup.exe /q /ACTION=Install /INSTANCENAME=SQLEXPRESS /FEATURES=SQLEngine /UPDATEENABLED=0 /SQLSVCACCOUNT='NT AUTHORITY\System' /SQLSYSADMINACCOUNTS='BUILTIN\Administrators' /TCPENABLED=1 /NPENABLED=0 /IACCEPTSQLSERVERLICENSETERMS ; \
    While (!(get-service 'MSSQL$SQLEXPRESS' -ErrorAction SilentlyContinue)) { Start-Sleep -Seconds 5 } ; \
    Stop-Service 'MSSQL$SQLEXPRESS' ; \
    Set-itemproperty -path 'HKLM:\software\microsoft\microsoft sql server\mssql15.SQLEXPRESS\mssqlserver\supersocketnetlib\tcp\ipall' -name tcpdynamicports -value '' ; \
    Set-itemproperty -path 'HKLM:\software\microsoft\microsoft sql server\mssql15.SQLEXPRESS\mssqlserver\supersocketnetlib\tcp\ipall' -name tcpport -value 1433 ; \
    Set-itemproperty -path 'HKLM:\software\microsoft\microsoft sql server\mssql15.SQLEXPRESS\mssqlserver\' -name LoginMode -value 2 ; \
    Set-Service 'MSSQL$SQLEXPRESS' -startuptype manual ; \
    Set-Service 'SQLTELEMETRY$SQLEXPRESS' -startuptype manual ; \
    Set-Service 'SQLWriter' -startuptype manual ; \
    Set-Service 'SQLBrowser' -startuptype manual ; \
    Remove-Item -Recurse -Force sqlexpress.exe, setup \
    }

COPY Run /Run/

RUN Invoke-WebRequest -Uri 'https://bcdocker.blob.core.windows.net/public/nav-docker-install.zip' -OutFile 'nav-docker-install.zip' ; \
    [Reflection.Assembly]::LoadWithPartialName('System.IO.Compression.Filesystem') | Out-Null ; \
    [System.IO.Compression.ZipFile]::ExtractToDirectory('.\nav-docker-install.zip', 'c:\run') ; \
    Remove-Item -Force 'nav-docker-install.zip' ; \
    . C:\Run\UpdatePowerShellExeConfig.ps1 ; \
    if ('true' -ne $env:bcOnly) { \
        Start-Service -Name `$SqlBrowserServiceName -ErrorAction Ignore -WarningAction Ignore ; \
        Start-Service -Name `$SqlWriterServiceName -ErrorAction Ignore -WarningAction Ignore ; \
        Start-Service -Name `$SqlServiceName -ErrorAction Ignore -WarningAction Ignore ; \
    } \
    Invoke-WebRequest -Uri 'https://bcartifacts.blob.core.windows.net/prerequisites/rewrite_2.0_rtw_x64.msi' -OutFile rewrite_amd64.msi ; \
    start-process -Wait -FilePath .\rewrite_amd64.msi -ArgumentList /quiet, /qn, /passive ; \
    Invoke-WebRequest -Uri 'https://bcartifacts.blob.core.windows.net/prerequisites/OpenXMLSDKv25.msi' -OutFile OpenXMLSDKV25.msi ; \
    start-process -Wait -FilePath .\OpenXMLSDKV25.msi -ArgumentList /quiet, /qn, /passive ; \
    Invoke-WebRequest -Uri 'https://bcartifacts.blob.core.windows.net/prerequisites/DotNetCore.1.0.4_1.1.1-WindowsHosting.exe' -OutFile DotNetCore-WindowsHosting.exe ; \
    start-process -Wait -FilePath .\DotNetCore-WindowsHosting.exe -ArgumentList /quiet ; \
    Invoke-WebRequest -Uri 'https://bcartifacts.blob.core.windows.net/prerequisites/dotnet-hosting-5.0.4-win.exe' -OutFile DotNet-Win.exe ; \
    start-process -Wait -FilePath .\DotNet-Win.exe -ArgumentList /quiet ; \
    Invoke-WebRequest -Uri 'https://bcartifacts.blob.core.windows.net/prerequisites/dotnet-hosting-6.0.13-win.exe' -OutFile DotNet6-Win.exe ; \
    start-process -Wait -FilePath .\DotNet6-Win.exe -ArgumentList /quiet ; \
    Invoke-WebRequest -Uri 'https://bcartifacts.blob.core.windows.net/prerequisites/sqlncli.msi' -OutFile sqlncli.msi ; \
    start-process -Wait -FilePath .\sqlncli.msi -ArgumentList /quiet, /qn, /passive ; \
    Invoke-WebRequest -Uri 'https://bcartifacts.blob.core.windows.net/prerequisites/vcredist_x86.exe' -OutFile vcredist_x86.exe ; \
    start-process -Wait -FilePath .\vcredist_x86.exe -ArgumentList /q, /norestart ; \
    Invoke-WebRequest -Uri 'https://bcartifacts.blob.core.windows.net/prerequisites/vcredist_x64.exe' -OutFile vcredist_x64.exe ; \
    start-process -Wait -FilePath .\vcredist_x64.exe -ArgumentList /q, /norestart ; \
    Remove-Item -Recurse -Force rewrite_amd64.msi, OpenXMLSDKV25.msi, DotNetCore-WindowsHosting.exe, DotNet-Win.exe, DotNet6-Win.exe, sqlncli.msi, vcredist_x86.exe, vcredist_x64.exe

HEALTHCHECK --interval=30s --timeout=10s CMD [ "powershell", ".\\Run\\HealthCheck.ps1" ]

EXPOSE 1433 80 8080 443 7045-7049 7083

CMD .\Run\start.ps1

LABEL maintainer="Dynamics SMB" \
      eula="https://go.microsoft.com/fwlink/?linkid=861843" \
      tag="$tag" \
      created="$created" \
      osversion="$osversion" \
      bcOnly="$bcOnly"
I also had to make some small changes in the build script. You can get all of this by cloning my fork https://github.com/tfenster/nav-docker of the BC image sources. The last thing you need to do is create a file called settings.ps1 with just this content to enable our bcOnly flag:
1
$bcOnly = "true"
With that in place, we can simply run build.ps1, which will generate a generic BC image called mygeneric with a tag 1.1.0.0. Generating a specific image works as usual with bccontainerhelper, we just need to make sure to reference our generic:
1
New-BcImage -artifactUrl (Get-BCArtifactUrl -type OnPrem -country de -version 23.0) -baseImage mygeneric:1.1.0.0 -imageName mybc
This gives us a specific image mybc:onprem-23.0.12034.12841-de, which we can use to create a container connected to the SQL container and database we started above:
1
2
3
4
5
6
7
8
9
10
11
12
13
14
15
16
17
  bconly:
    image: mybc:onprem-23.0.12034.12841-de
    environment:
      - accept_eula=y
      - accept_outdated=y
      - databaseUserName=sa
      - databasePassword=Super5ecret!
      - databaseServer=sql
      - databaseInstance=
      - databaseName=Demo Database BC (23-0)
      - webClient=N
      - httpSite=N
      - username=admin
      - password=Super5ecret!
      - usessl=n
    depends_on:
      - sql
The logs show that SQL and IIS / WebClient aren’t started:
1
2
3
4
5
6
7
8
9
10
11
12
13
14
15
16
17
18
19
20
21
22
23
Initializing...
Starting Container
Hostname is 89fdc0df0b7b
PublicDnsName is 89fdc0df0b7b
Using NavUserPassword Authentication
Import Encryption Key
Creating Self Signed Certificate
Self Signed Certificate Thumbprint F2664E0B77083F87C544EA450AD18B082FC5C824
DNS identity 89fdc0df0b7b
Modifying Service Tier Config File with Instance Specific Settings
Starting Service Tier
Container IP Address: 172.20.252.253
Container Hostname  : 89fdc0df0b7b
Container Dns Name  : 89fdc0df0b7b

Container Total Physical Memory is 16.0Gb
Container Free Physical Memory is 8.7Gb

Initialization took 98 seconds
Ready for connections!
Starting EventLog Monitor
Monitoring EventSources from EventLog[Application]:
- MicrosoftDynamicsNavServer$BC
Looking at the running processes, we also see no SQL and no IIS / WebClient, only the BCST and Reporting Services:
1
2
3
4
5
6
7
8
9
10
11
12
13
14
15
16
17
18
19
20
21
22
23
24
25
26
Name                                              PID                 CPU                 Private Working Set
smss.exe                                          5204                00:00:00.062        299kB
csrss.exe                                         2208                00:00:00.125        1.171MB
wininit.exe                                       12416               00:00:00.031        1.008MB
services.exe                                      14776               00:00:00.250        2.007MB
lsass.exe                                         14672               00:00:00.531        3.875MB
fontdrvhost.exe                                   7624                00:00:00.000        462.8kB
svchost.exe                                       5384                00:00:00.109        2.322MB
svchost.exe                                       8576                00:00:00.078        1.97MB
svchost.exe                                       11836               00:00:00.421        9.257MB
svchost.exe                                       11876               00:00:00.062        2.281MB
CExecSvc.exe                                      9556                00:00:00.046        835.6kB
svchost.exe                                       12636               00:00:00.593        6.738MB
svchost.exe                                       6956                00:00:00.203        4.559MB
svchost.exe                                       9316                00:00:00.015        868.4kB
svchost.exe                                       13768               00:00:01.078        12.77MB
powershell.exe                                    6692                00:00:07.812        214.4MB
svchost.exe                                       14588               00:00:00.093        2.757MB
svchost.exe                                       14684               00:00:00.031        1.143MB
Microsoft.Dynamics.Nav.Server.exe                 8136                00:01:49.656        2.079GB
Microsoft.BusinessCentral.Reporting.Service.exe   2828                00:00:00.812        21.46MB
conhost.exe                                       9296                00:00:00.015        5.89MB
WmiPrvSE.exe                                      12748               00:00:00.046        2.429MB
sppsvc.exe                                        5724                00:00:00.671        5.485MB
msdtc.exe                                         8648                00:00:00.062        1.978MB
SppExtComObj.Exe                                  5976                00:00:00.015        1.634MB
Just what we wanted :)
The details: The WebClient container
To validate that this has really worked, we can connect a WebClient. We could do this manually or with a custom Dockerfile, but since I didn’t really care about that tier, I went the easy route and just used a standard BC image. But we need an additional WebClient instance, so we need some scripting in the end of the startup and I took the opportunity to also remove the default WebClient instance, stop the BCST, and stop the SQL Server:
1
2
3
4
5
6
7
8
9
10
11
12
13
14
15
16
17
18
19
20
21
22
23
24
25
26
27
28
29
30
31
32
33
34
35
36
37
$WebClientFolder = (Get-Item "C:\Program Files\Microsoft Dynamics NAV\*\Web Client")[0]
$WebServerInstance = "bconly"
$ServerInstance = "BC"
$Server = "bconly"
$auth = "NavUserPassword"
$clientServicesPort = 7046
$ManagementServicesPort = 7045
$webClientPort = 80
$wwwRootPath = "c:\inetpub\wwwroot"

$certparam = @{}
$publishFolder = "$webClientFolder\WebPublish"

$NAVWebClientManagementModule = "$webClientFolder\Modules\NAVWebClientManagement\NAVWebClientManagement.psm1"
if (!(Test-Path $NAVWebClientManagementModule)) {
    $NAVWebClientManagementModule = "$webClientFolder\Scripts\NAVWebClientManagement.psm1"
}
Import-Module $NAVWebClientManagementModule
New-NAVWebServerInstance -PublishFolder $publishFolder `
                         -WebServerInstance "$WebServerInstance" `
                         -Server "$Server" `
                         -ServerInstance "$ServerInstance" `
                         -ClientServicesCredentialType $Auth `
                         -ClientServicesPort "$clientServicesPort" `
                         -WebSitePort $webClientPort @certparam

$navsettingsFile = Join-Path $wwwRootPath "$WebServerInstance\navsettings.json"
$config = Get-Content $navSettingsFile | ConvertFrom-Json
Add-Member -InputObject $config.NAVWebSettings -NotePropertyName "RequireSSL" -NotePropertyValue "true" -ErrorAction SilentlyContinue
$config.NAVWebSettings.RequireSSL = $false
Add-Member -InputObject $config.NAVWebSettings -NotePropertyName "PersonalizationEnabled" -NotePropertyValue "true" -ErrorAction SilentlyContinue
$config.NAVWebSettings.PersonalizationEnabled = $true
$config.NAVWebSettings.ManagementServicesPort = $ManagementServicesPort

Remove-NAVWebServerInstance BC
Stop-NAVServerInstance BC
Stop-Service 'MSSQL$SQLEXPRESS'
This code is heavily based on https://github.com/microsoft/navcontainerhelper/issues/331. You can see the configuration in lines 2-4 and then the actual creation of the new WebClient instance in lines 19-25. By putting this into a GitHub repo (https://github.com/tfenster/nav-docker-samples/tree/bconly) and using the mechanism described in my blog post from early 2018, we can run this when the container starts like this:
1
2
3
4
5
6
7
8
9
10
11
12
13
  web:
    image: standardbc:onprem-23.0.12034.12841-de
    ports:
      - "8080:80"
    environment:
      - accept_eula=y
      - accept_outdated=y
      - username=admin
      - password=Super5ecret!
      - usessl=n
      - folders=c:\run\my=https://github.com/tfenster/nav-docker-samples/archive/bconly.zip\nav-docker-samples-bconly
    depends_on:
      - bconly
If you check the processes here as well, you can see that no BCST and SQL is running, only IIS / WebClient:
1
2
3
4
5
6
7
8
9
10
11
12
13
14
15
16
17
18
19
20
21
22
23
24
25
26
27
28
Name                PID                 CPU                 Private Working Set
smss.exe            11772               00:00:00.062        299kB
csrss.exe           15148               00:00:00.093        1.294MB
wininit.exe         5336                00:00:00.031        983kB
services.exe        13572               00:00:00.468        2.109MB
lsass.exe           12076               00:00:00.890        4.436MB
fontdrvhost.exe     14996               00:00:00.000        458.8kB
svchost.exe         14476               00:00:00.078        2.298MB
svchost.exe         6952                00:00:00.171        2.06MB
svchost.exe         14564               00:00:01.593        9.417MB
svchost.exe         12616               00:00:00.046        2.535MB
CExecSvc.exe        2384                00:00:00.328        868.4kB
svchost.exe         16064               00:00:00.703        7.127MB
svchost.exe         12672               00:00:00.187        4.489MB
svchost.exe         8340                00:00:00.015        852kB
svchost.exe         5132                00:00:00.421        9.257MB
svchost.exe         12692               00:00:00.015        827.4kB
svchost.exe         9608                00:00:00.203        3.523MB
svchost.exe         10588               00:00:00.093        2.736MB
svchost.exe         12468               00:00:00.015        1.143MB
powershell.exe      12712               00:00:08.234        140.7MB
sqlbrowser.exe      12424               00:00:00.015        876.5kB
sqlwriter.exe       10888               00:00:00.015        1.208MB
svchost.exe         8056                00:00:00.359        4.62MB
w3wp.exe            13788               00:00:00.359        17.57MB
w3wp.exe            5524                00:00:00.062        4.702MB
msdtc.exe           9344                00:00:00.015        1.892MB
WmiPrvSE.exe        14040               00:00:00.046        1.442MB
Now we can finally go to http://localhost:8080/bconly. This gives us the WebClient in the web container, connected to the BC Service Tier in the bconly container, which in turn is connected to the SQL database in the sql container.
The details: Putting it all together
To give you the full picture, this is what the complete docker compose file looks like:
1
2
3
4
5
6
7
8
9
10
11
12
13
14
15
16
17
18
19
20
21
22
23
24
25
26
27
28
29
30
31
32
33
34
35
36
37
38
39
40
41
42
43
version: '3'

services:
  bconly:
    image: mybc:onprem-23.0.12034.12841-de
    environment:
      - accept_eula=y
      - accept_outdated=y
      - databaseUserName=sa
      - databasePassword=Super5ecret!
      - databaseServer=sql
      - databaseInstance=
      - databaseName=Demo Database BC (23-0)
      - webClient=N
      - httpSite=N
      - username=admin
      - password=Super5ecret!
      - usessl=n
    depends_on:
      - sql

  sql:
    image: tobiasfenster/mssql-server-dev-unsupported:2019-latest
    environment:
      - accept_eula=y
      - sa_password=Super5ecret!
      - attach_dbs=[{"dbName":"Demo Database BC (23-0)","dbFiles":["c:\\databases\\Demo Database BC (23-0)_Data.MDF","c:\\databases\\Demo Database BC (23-0)_Log.LDF"]}]
    volumes:
      - .:c:/databases/

  web:
    image: standardbc:onprem-23.0.12034.12841-de
    ports:
      - "8080:80"
    environment:
      - accept_eula=y
      - accept_outdated=y
      - username=admin
      - password=Super5ecret!
      - usessl=n
      - folders=c:\run\my=https://github.com/tfenster/nav-docker-samples/archive/bconly.zip\nav-docker-samples-bconly
    depends_on:
      - bconly
I probably won’t need this much in the future, but it certainly was nice to dig into the details of the BC container image once again :)
Webmentions:
No webmentions were found.
No likes were found.
No reposts were found.