.png)
Azure Container Storage - A howto and performance check
Azure Container Storage (ACS) is a storage solution for containers on the Azure Kubernetes Service. While the preview was already running for a while, a recent update caught my eye because it had a line with a lot of potential to help us:
With ACS, you can, …
- Optimize price-performance, with small volumes that require higher input/output operations per second (IOPS).
And that indeed turned out to be true in my tests. If you want to understand how to set up and use ACS, as well as how I exactly looked at the performance, see the details below.
The TL;DR
I mainly took two measures, always comparing ACS with “traditional” Premium SSD Azure Disk
- I looked at InputOoutput operations per second (IOPS) using fio as that is a performance metric often used for storage solutions.
- I also looked at restoring a bacpac file as my main scenario on AKS with a need for performant storage is running MS SQL Server in a MS Dynamics365 Business Central container, which sometimes requires bacpac restores.
The results for the IOPS checks show the following results:
| Test type | Storage type | Total read data | Read IOPS | Total written data | Write IOPS | fio param |
|---|---|---|---|---|---|---|
| Only reading | ACS | 3.261 GB | 59.365 | --rw=randread |
||
| Only reading | Azure Disk | 4.512 GB | 82.138 | --rw=randread |
||
| Only writing | ACS | 452 GB | 8.228 | --rw=randwrite |
||
| Only writing | Azure Disk | 109 GB | 1.984 | --rw=randwrite |
||
| 50/50 read/write | ACS | 453 GB | 8.247 | 452 GB | 8.228 | --rw=randrw |
| 50/50 read/write | Azure Disk | 7.184 MB | 128 | 7.175 MB | 128 | --rw=randrw |
- When only reading from the disk, somewhat to my surprise, I saw that the Azure Disk based solution actually performed noticeably better in pure read performance. Whether that is due to caching, bursting, or something else, I don’t know.
- When only writing to the disk, ACS showed a multiple of the performance of the Azure Disk.
- When combining read/write at 50/50 ACS outperformed Azure Disks by a factor of > 60. Again, I was a bit surprised, so I did this multiple times, but with the same result. This is not even the same ballpark!
To give you an idea, here is a graphical representation of the results. You can’t compare read, write and read/write with each other, but the results are calibrated to ACS so that ACS is always 100%, and you can see where Azure Disks perform better or worse.
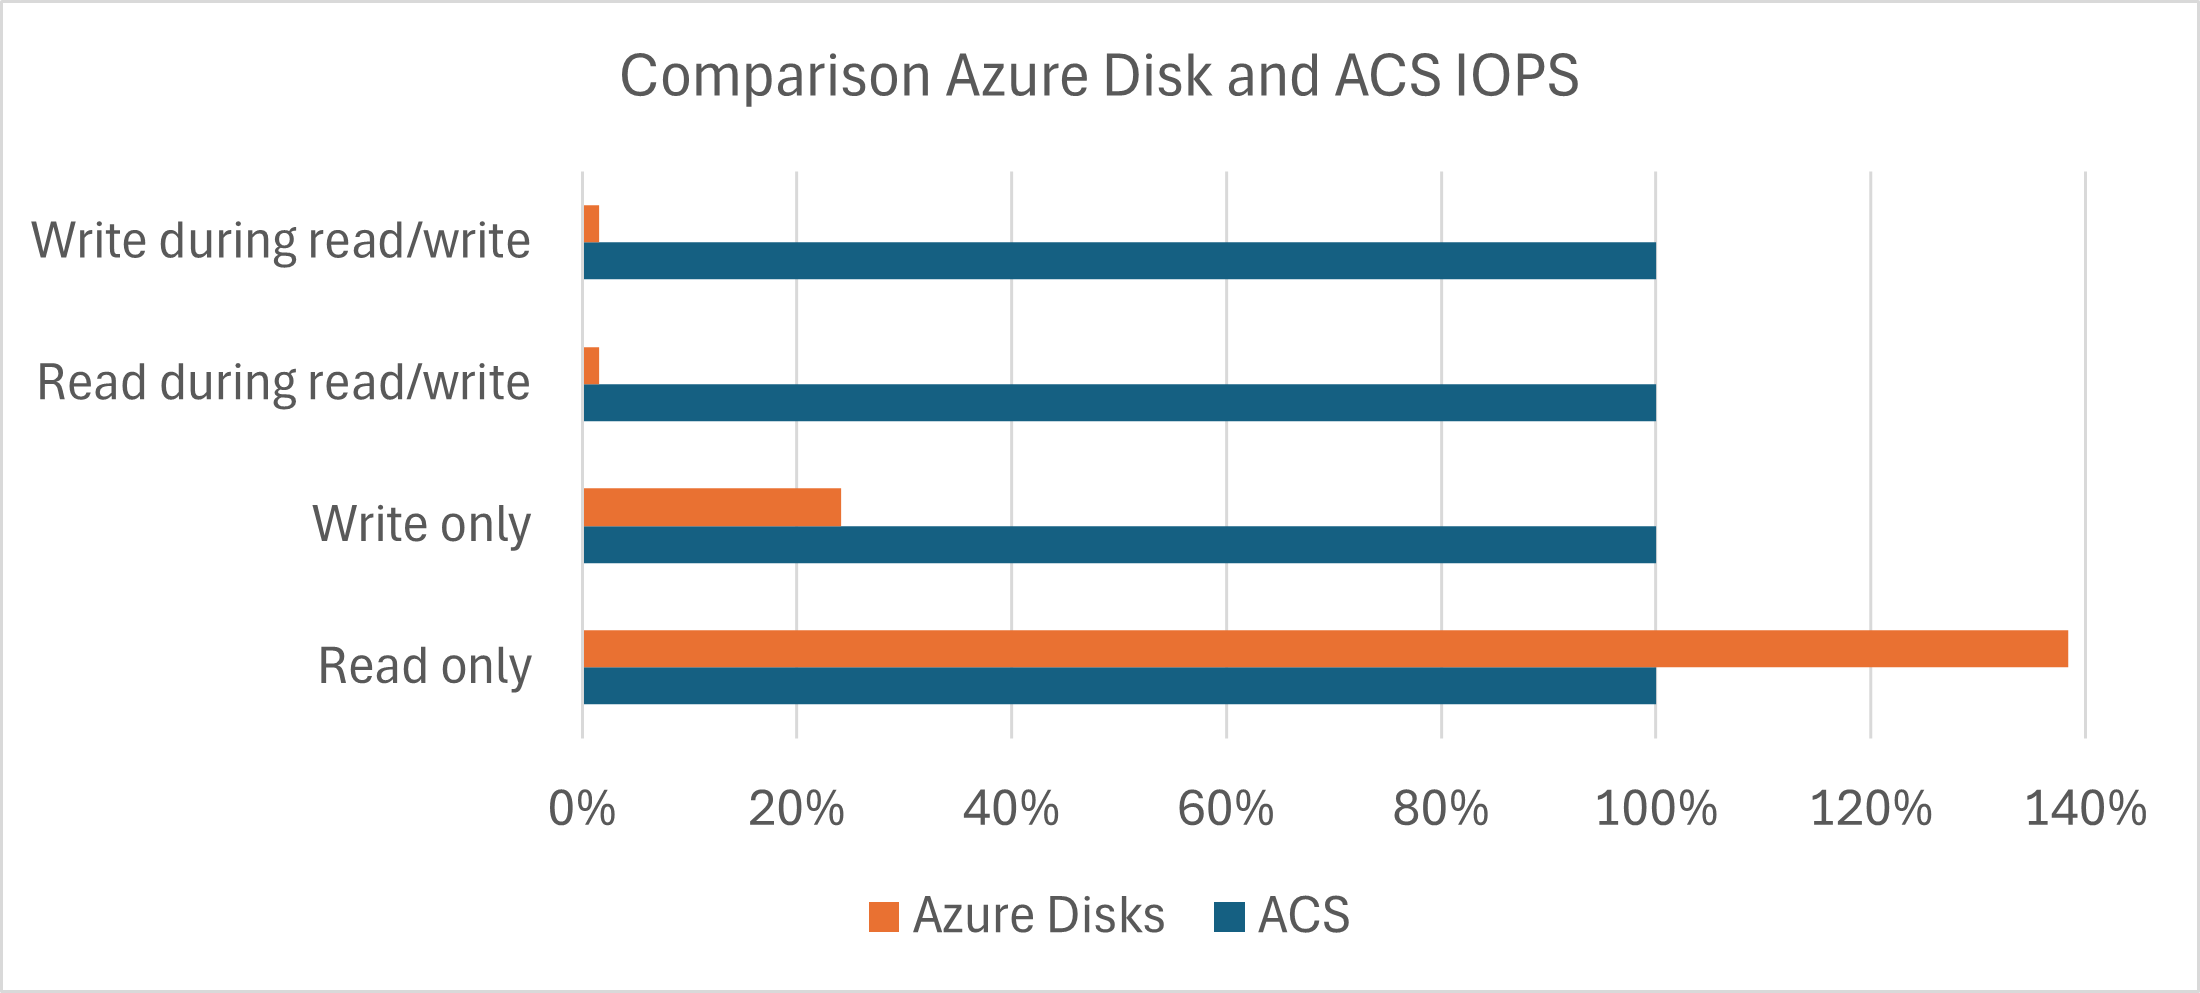
As I wrote above, I am still not sure if I did something wrong here as the disparity is huge, ranging from a bit of an edge for Azure Disks for reading through already a big gap for ACS for writing to an almost incredibly better performance for ACS on read/write testing.
The results for the “real-life” bacpac test show the following results:
- The ACS solution took an average time of 3h 14min 14sec to restore the bacpac.
- The Azure Disk based solution took an average tome of 3h 12min 19sec to restore the bacpac.
So in this test, the two solutions performed basically identically. Interestingly, both the fastest (3h 3m 58sec) and the slowest time (3h 25min 27sec) were on Azure Disks while ACS only varied between 3h 10min 56sec and 3h 19min 9sec. So it seems, at least in my tests, like ACS is a bit more consistent, but for this scenario there is no relevant performance difference.
The details: Setting it up
First, I had to set up an AKS cluster:
- Setup of a couple of variables for later usage:
1
2
3
4
$rgAndClusterName = "az-cont-stor-test"
$location = "westeurope"
$vmSize = "standard_d16s_v5"
$subscriptionId = "..."
- Log in, select the right subscription, register the required providers, add the AKS extension and create a resource group to hold the AKS cluster later
1
2
3
4
5
az account set --subscription=$subscriptionId
az provider register --namespace Microsoft.ContainerService --wait
az provider register --namespace Microsoft.KubernetesConfiguration --wait
az extension add --upgrade --name k8s-extension
az group create --name $rgAndClusterName --location $location
- Create the AKS cluster with 3 nodes (2 would have also worked, but that is just the default in my go-to script to create an AKS cluster…). This takes a couple of minutes.1
1
az aks create -g $rgAndClusterName -n $rgAndClusterName --node-count 3 -s $vmSize --generate-ssh-keys --network-plugin azure
- Now we get the credentials for our cluster and validate them by retrieving a list of the nodes
1
2
3
4
5
6
PWSH C:\Users\tfenster\az-cont-stor> az aks get-credentials --resource-group $rgAndClusterName --name $rgAndClusterName
PWSH C:\Users\tfenster\az-cont-stor> kubectl get nodes
NAME                                STATUS   ROLES   AGE   VERSION
aks-nodepool1-42164658-vmss000000   Ready    agent   36m   v1.27.7
aks-nodepool1-42164658-vmss000001   Ready    agent   36m   v1.27.7
aks-nodepool1-42164658-vmss000002   Ready    agent   36m   v1.27.7
The base setup for ACS follows the official docs:
- First, we need to set a label on the nodepool so that we can use ACS
1
az aks nodepool update --resource-group $rgAndClusterName --cluster-name $rgAndClusterName --name nodepool1 --labels acstor.azure.com/io-engine=acstor
- Then we get the managed identity object id of the cluster and give it contributor permissions for the subscription so that the following steps work. Of course, this is only valid for a test/dev scenario and even there might be a bit careless, but for my temporary test cluster, I accepted it
1
2
$AKS_MI_OBJECT_ID=$(az aks show --name $rgAndClusterName --resource-group $rgAndClusterName --query "identityProfile.kubeletidentity.objectId" -o tsv)
az role assignment create --assignee $AKS_MI_OBJECT_ID --role "Contributor" --scope "/subscriptions/$subscriptionId"
- After that, we create a Kubernetes extension for ACS
1
2
az config set extension.use_dynamic_install=yes_without_prompt
az k8s-extension create --cluster-type managedClusters --cluster-name $rgAndClusterName --resource-group $rgAndClusterName --name az-cont-stor --extension-type microsoft.azurecontainerstorage --scope cluster --release-train stable --release-namespace acstor
- To check if that has worked, you can list the extensions. If the
provisioningStateisSucceeded, you are fine
1
2
3
4
5
6
PWSH C:\Users\tfenster\az-cont-stor> az k8s-extension list --cluster-name $rgAndClusterName --resource-group $rgAndClusterName --cluster-type managedClusters
{
...
  "provisioningState": "Succeeded",
...
}
- With that, we have the basics in place and can create a storage pool. The nice thing is that we can use regular Kubernetes object definitions and apply them with
kubectlfrom here on. For my tests, I created an Azure Disk based storage pool of Premium SSDs with a size of 2 TiB to be comparable with the setup based only on Azure Disks without ACS. Assuming that the following script is calledacstor-storagepool.yaml, you could apply it withkubectl apply -f acstor-storagepool.yaml
1
2
3
4
5
6
7
8
9
10
11
12
apiVersion: containerstorage.azure.com/v1beta1
kind: StoragePool
metadata:
  name: azuredisk
  namespace: acstor
spec:
  poolType:
    azureDisk:
      skuName: Premium_LRS
  resources:
    requests:
      storage: 2Ti
- Azure automatically creates a Storage Class after the storage pool is created, using the naming convention acstor-< storage pool name >, so in our case
acstor-azuredisk. To use our new storage pool and also to get comparable Azure Disks, the next thing is to create Persistent Volume Claims. You can see a PVC based on ACS for fio calledazurediskpvc-fio-linux2, a PVC based on Azure Disks for fio calledazure-managed-disk-fio-linux, a PVC based on ACS for SQL calledazurediskpvc-sql-linuxand a PVC based on Azure Disks for SQL calledazure-managed-disk-sql-linux. All of them have a size 8 GiB, which has a huge impact on the performance of the Azure Disk PVCs (compare the docs again), but not on the ACS PVCs.
1
2
3
4
5
6
7
8
9
10
11
12
13
14
15
16
17
18
19
20
21
22
23
24
25
26
27
28
29
30
31
32
33
34
35
36
37
38
39
40
41
42
43
44
45
46
47
apiVersion: v1
kind: PersistentVolumeClaim
metadata:
  name: azurediskpvc-fio-linux
spec:
  accessModes:
    - ReadWriteOnce
  storageClassName: acstor-azuredisk
  resources:
    requests:
      storage: 8Gi
---
apiVersion: v1
kind: PersistentVolumeClaim
metadata:
  name: azurediskpvc-sql-linux
spec:
  accessModes:
    - ReadWriteOnce
  storageClassName: acstor-azuredisk
  resources:
    requests:
      storage: 8Gi
---
apiVersion: v1
kind: PersistentVolumeClaim
metadata:
  name: azure-managed-disk-fio-linux
spec:
  accessModes:
    - ReadWriteOnce
  storageClassName: managed-csi-premium
  resources:
    requests:
      storage: 8Gi
---
apiVersion: v1
kind: PersistentVolumeClaim
metadata:
  name: azure-managed-disk-sql-linux
spec:
  accessModes:
    - ReadWriteOnce
  storageClassName: managed-csi-premium
  resources:
    requests:
      storage: 8Gi
With that, we have everything in place: Our AKS cluster, prepared for ACS. A storage pool, which also gave us a Storage Class. The PVCs, both for ACS and Azure Disks.
The details: Getting IOPS with fio
The fio-based tests were done in a single pod which has volumes for both ACS and Azure Disks as follows:
1
2
3
4
5
6
7
8
9
10
11
12
13
14
15
16
17
18
19
20
21
22
23
24
25
26
kind: Pod
apiVersion: v1
metadata:
  name: fiopod
spec:
  nodeSelector:
    acstor.azure.com/io-engine: acstor
    kubernetes.io/os: linux
  volumes:
    - name: azurediskpv
      persistentVolumeClaim:
        claimName: azurediskpvc-fio-linux
    - name: azure-managed-disk
      persistentVolumeClaim:
        claimName: azure-managed-disk-fio-linux
  containers:
    - name: fio
      image: nixery.dev/shell/fio
      args:
        - sleep
        - "1000000"
      volumeMounts:
        - mountPath: "/acstor-volume"
          name: azurediskpv
        - mountPath: "/azdisk-volume"
          name: azure-managed-disk
You can see the volume based on the ACS PVC in lines 10-12 and the volume based on the Azure Disk PVC in lines 13-15. The container then mounts the ACS volume to /acstor-volume in lines 23 and 24 and the Azure Disk volume to /azdisk-volume in lines 25 and 26. With kubectl describe pod fiopod you can follow the process of starting the container after all requirements are in place, which should show something like this
1
2
3
4
5
6
7
8
9
10
11
12
13
14
15
16
17
18
19
20
21
22
23
24
25
26
27
28
29
30
31
32
33
34
35
36
37
38
39
40
41
42
43
44
45
46
47
48
49
50
51
52
53
54
55
56
57
58
59
60
61
62
63
64
65
66
67
68
PWSH C:\Users\tfenster\az-cont-stor> kubectl describe pod fiopod
Name:             fiopod
Namespace:        default
Priority:         0
Service Account:  default
Node:             aks-nodepool1-42164658-vmss000002/10.224.0.4
Start Time:       Sun, 07 Jan 2024 18:21:50 +0100
Labels:           <none>
Annotations:      <none>
Status:           Running
IP:               10.224.0.16
IPs:
  IP:  10.224.0.16
Containers:
  fio:
    Container ID:  containerd://3b100badbaf4f529aafe6694e6508c8ac43aab4f688b7076abbd42f97ca28efc
    Image:         nixery.dev/shell/fio
    Image ID:      nixery.dev/shell/fio@sha256:d129b45ec0d50fc48511d5881ffbdb07dca04d9aede65990544d5889bd08e04a
    Port:          <none>
    Host Port:     <none>
    Args:
      sleep
      1000000
    State:          Running
      Started:      Sun, 07 Jan 2024 18:22:13 +0100
    Ready:          True
    Restart Count:  0
    Environment:    <none>
    Mounts:
      /acstor-volume from azurediskpv (rw)
      /azdisk-volume from azure-managed-disk (rw)
      /var/run/secrets/kubernetes.io/serviceaccount from kube-api-access-rj5cx (ro)
Conditions:
  Type              Status
  Initialized       True
  Ready             True
  ContainersReady   True
  PodScheduled      True
Volumes:
  azurediskpv:
    Type:       PersistentVolumeClaim (a reference to a PersistentVolumeClaim in the same namespace)
    ClaimName:  azurediskpvc-fio-linux
    ReadOnly:   false
  azure-managed-disk:
    Type:       PersistentVolumeClaim (a reference to a PersistentVolumeClaim in the same namespace)
    ClaimName:  azure-managed-disk-fio-linux
    ReadOnly:   false
  kube-api-access-rj5cx:
    Type:                    Projected (a volume that contains injected data from multiple sources)
    TokenExpirationSeconds:  3607
    ConfigMapName:           kube-root-ca.crt
    ConfigMapOptional:       <nil>
    DownwardAPI:             true
QoS Class:                   BestEffort
Node-Selectors:              acstor.azure.com/io-engine=acstor
                             kubernetes.io/os=linux
Tolerations:                 node.kubernetes.io/not-ready:NoExecute op=Exists for 300s
                             node.kubernetes.io/unreachable:NoExecute op=Exists for 300s
Events:
  Type    Reason                  Age   From                     Message
  ----    ------                  ----  ----                     -------
  Normal  Scheduled               34s   default-scheduler        Successfully assigned default/fiopod to aks-nodepool1-42164658-vmss000002
  Normal  SuccessfulAttachVolume  34s   attachdetach-controller  AttachVolume.Attach succeeded for volume "pvc-46806a95-1ae9-4df5-8f92-8054d08f060b"
  Normal  SuccessfulAttachVolume  22s   attachdetach-controller  AttachVolume.Attach succeeded for volume "pvc-ceb1e00c-7243-42a9-adbc-1611ea876359"
  Normal  Pulling                 21s   kubelet                  Pulling image "nixery.dev/shell/fio"
  Normal  Pulled                  12s   kubelet                  Successfully pulled image "nixery.dev/shell/fio" in 9.128757706s (9.128768307s including waiting)
  Normal  Created                 12s   kubelet                  Created container fio
  Normal  Started                 12s   kubelet                  Started container fio
If you take a closer look at the events in the end, you can also see an interesting side effect of ACS: While the ACS volume pvc-46806a95-1ae9-4df5-8f92-8054d08f060b is attached immediately after the pod is assigned to a node, the Azure Disk volume pvc-ceb1e00c-7243-42a9-adbc-1611ea876359 takes 12 seconds to attach. My experience with bigger volumes is that it can take even longer, so ACS also gives you faster startup times.
Once the container has successfully started, as you can see in the last event, we can connect with something like kubectl exec -it fiopod -- bash and run the tests with fio. I have to say that I am not a fio expert, but I more or less directly followed the docs, step 5. I changed the block size to 16k, which is the default for SQL Server, and I tested pure read, pure write and mixed read/write performance. I used a runtime of 3600 seconds = 1 hour to avoid any temporary effects and I ran the tests twice, but discarded the first run to avoid any first-time effects.
1
2
3
4
5
6
fio --name=benchtest --size=800m --filename=/acstor-volume/test --direct=1 --rw=randread --ioengine=libaio --bs=16k --iodepth=16 --numjobs=8 --time_based --runtime=3600
fio --name=benchtest --size=800m --filename=/acstor-volume/test --direct=1 --rw=randwrite --ioengine=libaio --bs=16k --iodepth=16 --numjobs=8 --time_based --runtime=3600
fio --name=benchtest --size=800m --filename=/acstor-volume/test --direct=1 --rw=randrw --ioengine=libaio --bs=16k --iodepth=16 --numjobs=8 --time_based --runtime=3600
fio --name=benchtest --size=800m --filename=/azdisk-volume/test --direct=1 --rw=randread --ioengine=libaio --bs=16k --iodepth=16 --numjobs=8 --time_based --runtime=3600
fio --name=benchtest --size=800m --filename=/azdisk-volume/test --direct=1 --rw=randwrite --ioengine=libaio --bs=16k --iodepth=16 --numjobs=8 --time_based --runtime=3600
fio --name=benchtest --size=800m --filename=/azdisk-volume/test --direct=1 --rw=randrw --ioengine=libaio --bs=16k --iodepth=16 --numjobs=8 --time_based --runtime=3600
The result output of fio are really detailed, but I’ll focus on what I think are the most important parts:
1
2
3
4
5
6
7
8
9
10
11
12
13
14
15
16
17
18
19
20
21
22
23
24
25
26
27
28
29
30
31
32
33
34
35
36
37
38
39
40
41
42
43
benchtest: (g=0): rw=randread, bs=(R) 16.0KiB-16.0KiB, (W) 16.0KiB-16.0KiB, (T) 16.0KiB-16.0KiB, ioengine=libaio, iodepth=16
...
Starting 8 processes
...
Run status group 0 (all jobs):
   READ: bw=864MiB/s (906MB/s), 108MiB/s-108MiB/s (113MB/s-114MB/s), io=3037GiB (3261GB), run=3600001-3600002msec
... <next run> ...
benchtest: (g=0): rw=randwrite, bs=(R) 16.0KiB-16.0KiB, (W) 16.0KiB-16.0KiB, (T) 16.0KiB-16.0KiB, ioengine=libaio, iodepth=16
...
Starting 8 processes
...
Run status group 0 (all jobs):
  WRITE: bw=120MiB/s (125MB/s), 14.9MiB/s-15.0MiB/s (15.6MB/s-15.7MB/s), io=421GiB (452GB), run=3600004-3600004msec
... <next run> ...
benchtest: (g=0): rw=randrw, bs=(R) 16.0KiB-16.0KiB, (W) 16.0KiB-16.0KiB, (T) 16.0KiB-16.0KiB, ioengine=libaio, iodepth=16
...
Starting 8 processes
...
Run status group 0 (all jobs):
   READ: bw=120MiB/s (126MB/s), 14.9MiB/s-15.1MiB/s (15.6MB/s-15.8MB/s), io=421GiB (453GB), run=3600018-3600020msec
  WRITE: bw=120MiB/s (126MB/s), 14.9MiB/s-15.1MiB/s (15.6MB/s-15.8MB/s), io=421GiB (452GB), run=3600018-3600020msec
... <next run> ...
benchtest: (g=0): rw=randread, bs=(R) 16.0KiB-16.0KiB, (W) 16.0KiB-16.0KiB, (T) 16.0KiB-16.0KiB, ioengine=libaio, iodepth=16
...
Starting 8 processes
...
Run status group 0 (all jobs):
   READ: bw=1195MiB/s (1253MB/s), 149MiB/s-150MiB/s (156MB/s-157MB/s), io=4202GiB (4512GB), run=3600001-3600001msec
... <next run> ...
benchtest: (g=0): rw=randwrite, bs=(R) 16.0KiB-16.0KiB, (W) 16.0KiB-16.0KiB, (T) 16.0KiB-16.0KiB, ioengine=libaio, iodepth=16
...
Starting 8 processes
...
Run status group 0 (all jobs):
  WRITE: bw=28.8MiB/s (30.2MB/s), 3689KiB/s-3692KiB/s (3777kB/s-3780kB/s), io=101GiB (109GB), run=3600183-3601027msec
... <next run> ...
benchtest: (g=0): rw=randrw, bs=(R) 16.0KiB-16.0KiB, (W) 16.0KiB-16.0KiB, (T) 16.0KiB-16.0KiB, ioengine=libaio, iodepth=16
...
Starting 8 processes
...
Run status group 0 (all jobs):
   READ: bw=1948KiB/s (1995kB/s), 242KiB/s-245KiB/s (248kB/s-251kB/s), io=6851MiB (7184MB), run=3600983-3601031msec
  WRITE: bw=1946KiB/s (1993kB/s), 243KiB/s-244KiB/s (249kB/s-250kB/s), io=6843MiB (7175MB), run=3600983-3601031msec
To repeat the analysis of the TL;DR above:
- The runs where we are only reading data (lines 1-6 for ACS and lines 23-28 for Azure Disk) show 3.261 GB read in an hour for the ACS solution and 4.512 GB read in an hour for the Azure Disk based solution. That means 59.365 IOPS for ACS and 82.138 IOPS for Azure Disk. To put that into perspective, those are astronomical numbers, almost certainly heavily influenced by caching and bursting. Or something is wrong with my setup, which certainly also could be the case. If anyone has ideas, please let me know.
- When we only write data (lines 8-13 for ACS, lines 30-35 for Azure Disk), we get 452 GB for ACS and 109 GB for Azure Disks, which means 8.228 IOPS for ACS and 1.984 IOPS for Azure Disks. Still impressive numbers, but somewhat more expected. The fact that ACS can provide more than 4 times more performance if we look at IOPS is more than I would have expected, but I ran this multiple times, so it appears to be solid.
- The last type of runs where we read and write data at a 50/50 ratio (lines 15-21 for ACS and lines 37-43 for Azure Disk) show 453 GB read / 452 GB written for ACS, and only 7.184 MB read / 7.175 MB write. Notice the difference between GB for ACS and MB for Azure Disk! This means 8.247 read IOPS / 8.228 write IOPS for ACS vs. 128 read IOPS / 128 write IOPS for Azure Disks. This is completely out of proportion, again maybe because the Azure Disk could no longer burst or indeed a vastly superior performance for ACS, I am honestly not sure. But again, I ran this multiple times with comparable results.
Keep in mind that IOPS are a nice metric for storage devices, but don’t always translate to real-life performance of your storage solution. Which is why I went into my second test scenario as follows.
The details: Getting “real-life” execution times with bacpac restores
As mentioned in the TL;DR, the main resource-intensive workload for me on AKS are MS SQL Servers working on Business Central databases. And the “killer” scenario comes up when we have to get a Business Central Online export - technically a .bacpac file - and restore that. The runtimes are insanely long even for small databases, so we first convert them from .bacpac to .bak, which means we restore the .bacpac to a database and then create a backup of that database as .bak. As I suspected that at least some of those very long runtimes are I/O bound, I decided to use that as my second, “real-life” scenario.
Because I knew that I would look at very long runtimes, I decided to use a somewhat different approach: This time I used two pods, one with a container using an ACS volume and one with a container using an Azure Disk volume. They look like this:
1
2
3
4
5
6
7
8
9
10
11
12
13
14
15
16
17
18
19
20
21
22
23
24
25
26
27
28
29
30
31
32
33
34
35
36
37
38
39
kind: Pod
apiVersion: v1
metadata:
  name: sqlpod-acstor
  labels:
    app: sqlpod-acstor
spec:
  nodeSelector:
    acstor.azure.com/io-engine: acstor
    kubernetes.io/os: linux
  volumes:
    - name: azurediskpv
      persistentVolumeClaim:
        claimName: azurediskpvc-sql-linux
  containers:
    - name: sql-acstor
      image: tobiasfenster/mssql-with-sqlpackage:2022-latest
      volumeMounts:
        - mountPath: "/acstor-volume"
          name: azurediskpv
      env:
        - name: ACCEPT_EULA
          value: "Y"
        - name: MSSQL_SA_PASSWORD
          value: "Super5ecret!"
      command: ["/bin/sh"]
      args: ["-c", "sleep infinity"]
  affinity:
    podAntiAffinity:
      preferredDuringSchedulingIgnoredDuringExecution:
      - weight: 100
        podAffinityTerm:
          labelSelector:
            matchExpressions:
              - key: app
                operator: In
                values:
                  - sqlpod-azdisk
          topologyKey: kubernetes.io/hostname
and
1
2
3
4
5
6
7
8
9
10
11
12
13
14
15
16
17
18
19
20
21
22
23
24
25
26
27
28
29
30
31
32
33
34
35
36
37
38
kind: Pod
apiVersion: v1
metadata:
  name: sqlpod-azdisk
  labels:
    app: sqlpod-azdisk
spec:
  nodeSelector:
    kubernetes.io/os: linux
  volumes:
    - name: azure-managed-disk
      persistentVolumeClaim:
        claimName: azure-managed-disk-sql-linux
  containers:
    - name: sql-azdisk
      image: tobiasfenster/mssql-with-sqlpackage:2022-latest
      volumeMounts:
        - mountPath: "/azdisk-volume"
          name: azure-managed-disk
      env:
        - name: ACCEPT_EULA
          value: "Y"
        - name: MSSQL_SA_PASSWORD
          value: "Super5ecret!"
      command: ["/bin/sh"]
      args: ["-c", "sleep infinity"]
  affinity:
    podAntiAffinity:
      preferredDuringSchedulingIgnoredDuringExecution:
      - weight: 100
        podAffinityTerm:
          labelSelector:
            matchExpressions:
              - key: app
                operator: In
                values:
                  - sqlpod-acstor
          topologyKey: kubernetes.io/hostname
Things to note here:
- The
volumesandvolumeMountsin lines 12-14 and 19/20 or 11-13 and 18/19 respectively show you that thesqlpod-acstorpod uses the ACS PVC and thesqlpod-azdiskuses the Azure Disk PVC. - The
podAntiAffinityparts (lines 29-39 or 28-38 respectively) make sure that the two pods end up on different nodes so that they don’t interfere with each other. If you want to learn more about the concept, check the docs. This allowed me to run the tests in parallel so that the overall runtime was more or less half than if I had done them sequentially. If tests run for a day, and then you find out that you made a mistake, that is pretty annoying… - You can also spot the
tobiasfenster/mssql-with-sqlpackage:2022-latestimage being used in line 17 or line 16 respectively. This is just a small addition to the standard MS SQL image, which brings in thesqlpackagetool used to restore bacpacs. This uses a simplified version of a Dockerfile created by Markus Lippert. Far away from production-ready, but sufficient for this test.
After applying those objects, I connected to the containers with kubectl exec as explained in the fio tests above and did the following preparation. I am only showing the ACS version, but the Azure Disk version works basically identically, just with the different mount path:
1
2
3
4
5
nohup /opt/mssql/bin/permissions_check.sh /opt/mssql/bin/sqlservr > /dev/null 2>&1 &
mkdir /tmp/bkp
mkdir /acstor-volume/db
rm -r /acstor-volume/db/*
wget https://nottobeshared.com/db.bacpac -O /tmp/bkp/db.bacpac
The first line starts the SQL Server. Lines 2-4 creates folders if needed and potentially cleans up files left in the volumes by previous runs (and I did quite a number of those…). Line 5 downloads a .bacpac to the /tmp folder for later usage.
The actual testing looks like this, again only shown for ACS, but Azure Disk works the same
1
2
3
4
5
6
7
for i in {1..5}
do
   echo "Import $i dbacstor"
   /opt/mssql-tools/bin/sqlcmd -S localhost -U sa -P Super5ecret! -Q "CREATE DATABASE dbacstor ON (NAME = dbacstor_dat, FILENAME = '/acstor-volume/db/dbacstor.mdf') LOG ON (NAME = dbacstor_log, FILENAME = '/acstor-volume/db/dbacstor.ldf')"
   time sqlpackage /a:Import /tsn:localhost /tdn:dbacstor /tu:sa /tp:Super5ecret! /ttsc:true /sf:/tmp/bkp/db.bacpac /p:"CommandTimeout=600" /p:"DatabaseLockTimeout=600" /q:true &> alloutput_dbacstor_$i.txt
   /opt/mssql-tools/bin/sqlcmd -S localhost -U sa -P Super5ecret! -Q "DROP DATABASE dbacstor"
done
This is a for loop with 5 iterations, which in line 3 outputs the current run number and then creates a new database with the backing files in the right folders. Line 5 uses sqlpackage to restore the .bacpac that was initially downloaded and gets the runtime with the time command. Line 6 then drops the database again so that it can be re-created in the next iteration.
The output I got looks like this for ACS
1
2
3
4
5
6
7
8
9
10
11
12
13
14
15
16
17
18
19
20
21
22
23
24
25
Import 1 dbacstor

real    190m56.505s
user    92m14.391s
sys     1m23.157s
Import 2 dbacstor

real    191m57.523s
user    93m11.703s
sys     1m24.109s
Import 3 dbacstor

real    194m11.333s
user    94m51.367s
sys     1m22.619s
Import 4 dbacstor

real    199m9.945s
user    96m48.777s
sys     1m25.807s
Import 5 dbacstor

real    194m56.491s
user    94m2.945s
sys     1m23.855s
And for Azure Disks, it looks like this
1
2
3
4
5
6
7
8
9
10
11
12
13
14
15
16
17
18
19
20
21
22
23
24
25
Import 1 dbazdisk

real    183m58.631s
user    95m20.392s
sys     1m20.951s
Import 2 dbazdisk

real    185m40.838s
user    93m44.357s
sys     1m22.865s
Import 3 dbazdisk

real    205m27.441s
user    96m53.005s
sys     1m26.078s
Import 4 dbazdisk

real    188m33.670s
user    97m23.513s
sys     1m25.220s
Import 5 dbazdisk

real    197m59.949s
user    97m22.984s
sys     1m24.528s
As I already wrote in the TL;DR, not a really relevant difference, with the biggest observation that Azure Disks seem to fluctuate a bit more while ACS is a bit slower on average for this scenario.
The details: A failed attempt with diskspd
Just a brief note on something else that I have tried: Microsoft also provides diskspd as a tool for storage benchmarks. However, because we are bound to Linux with ACS, we have to use the less well maintained Linux version. This version has open issues since the end of 2021, which I tried to solve with the somewhat blunt approach of ignoring the errors. This allowed me to successfully use a GitHub action to put it into a container image and run that in my AKS cluster, but the results were completely off. Repeats of test runs fluctuated between 100 IOPS and 100.000 IOPS and I couldn’t figure out how to stabilize the results. In the end, I decided to stick with the two scenarios mentioned above.
-
Note that you would have to add the
--windows-admin-usernameand--windows-admin-passwordparameters if you wanted to later also create a Windows-based nodepool, but unfortunately ACS is not supported on Windows. You can run the commands, it doesn’t look too bad in the beginning, but then it crashes and burns spectacularly with no recognizable attempt to fail in a controlled manner. As so often in the container space, even with Microsoft, Linux is leading the way and Windows may or may not follow. ↩ -
The
-linuxsuffix also shows you my initial willingness to check this also on Windows. Never lose hope, right? ↩
Webmentions:
No webmentions were found.

No reposts were found.